
TL;DR
- Size: A1 (594 × 841 mm) is the standard welcome sign and reads clearly from about five metres; long entrances suit up to 900 × 1200 mm.
- Material sets the mood: acrylic for clean and modern, mirror for evening glow, satin and linen for soft and romantic, shaped foamboard for colour.
- Keep the wording short: a greeting, your names, the date and, if you like, the venue. Your names should be the biggest line.
- Design it as a set: the welcome sign looks best matched to your seating chart and invitations, or combined with a QR seating code.
- Cost and timing: Ghost Booth Events signage packages start from $500; allow four to six weeks from design to delivery.
The best wedding welcome sign ideas come down to three choices: the material, the shape and how the sign stands up. Below are 25 welcome sign designs from real Melbourne weddings, almost all shown with a photo of the actual sign, plus the size, wording and stand details that make each one work.
This post is about welcome signs only. If you are planning the whole suite, from the bar menu to the table numbers, our wedding signage ideas post covers every sign across the day.
Before you choose: the three welcome sign basics
Size. A1 (594 × 841 mm) is the most common welcome sign size on an easel, and it reads clearly from about five metres. If your venue has a long driveway, a wide foyer or an outdoor ceremony, go larger, up to 900 × 1200 mm, or use a free-standing arch panel.
Wording. Most guests read a welcome sign in passing, on their way to a drink. A greeting, your names and the date is enough. Add the venue name or a short line if the design has room. For 50 ready-to-use options, see our wedding welcome sign wording examples.
Support. Every sign needs something to stand on: an easel, a metal frame stand, a plinth, or simply leaning against a wall with florals at the base. Fabric signs hang from a frame. Decide this early because it changes the shape and size of the sign.
Acrylic welcome sign ideas
Acrylic is the most popular material for welcome signs. It comes clear, frosted, white or coloured, with printed or vinyl lettering.
1. White acrylic with a floral topper
A white sign with black lettering is the most legible option there is. Adding a small floral arrangement to the top edge turns a simple easel sign into a styled piece without adding clutter to the wording.
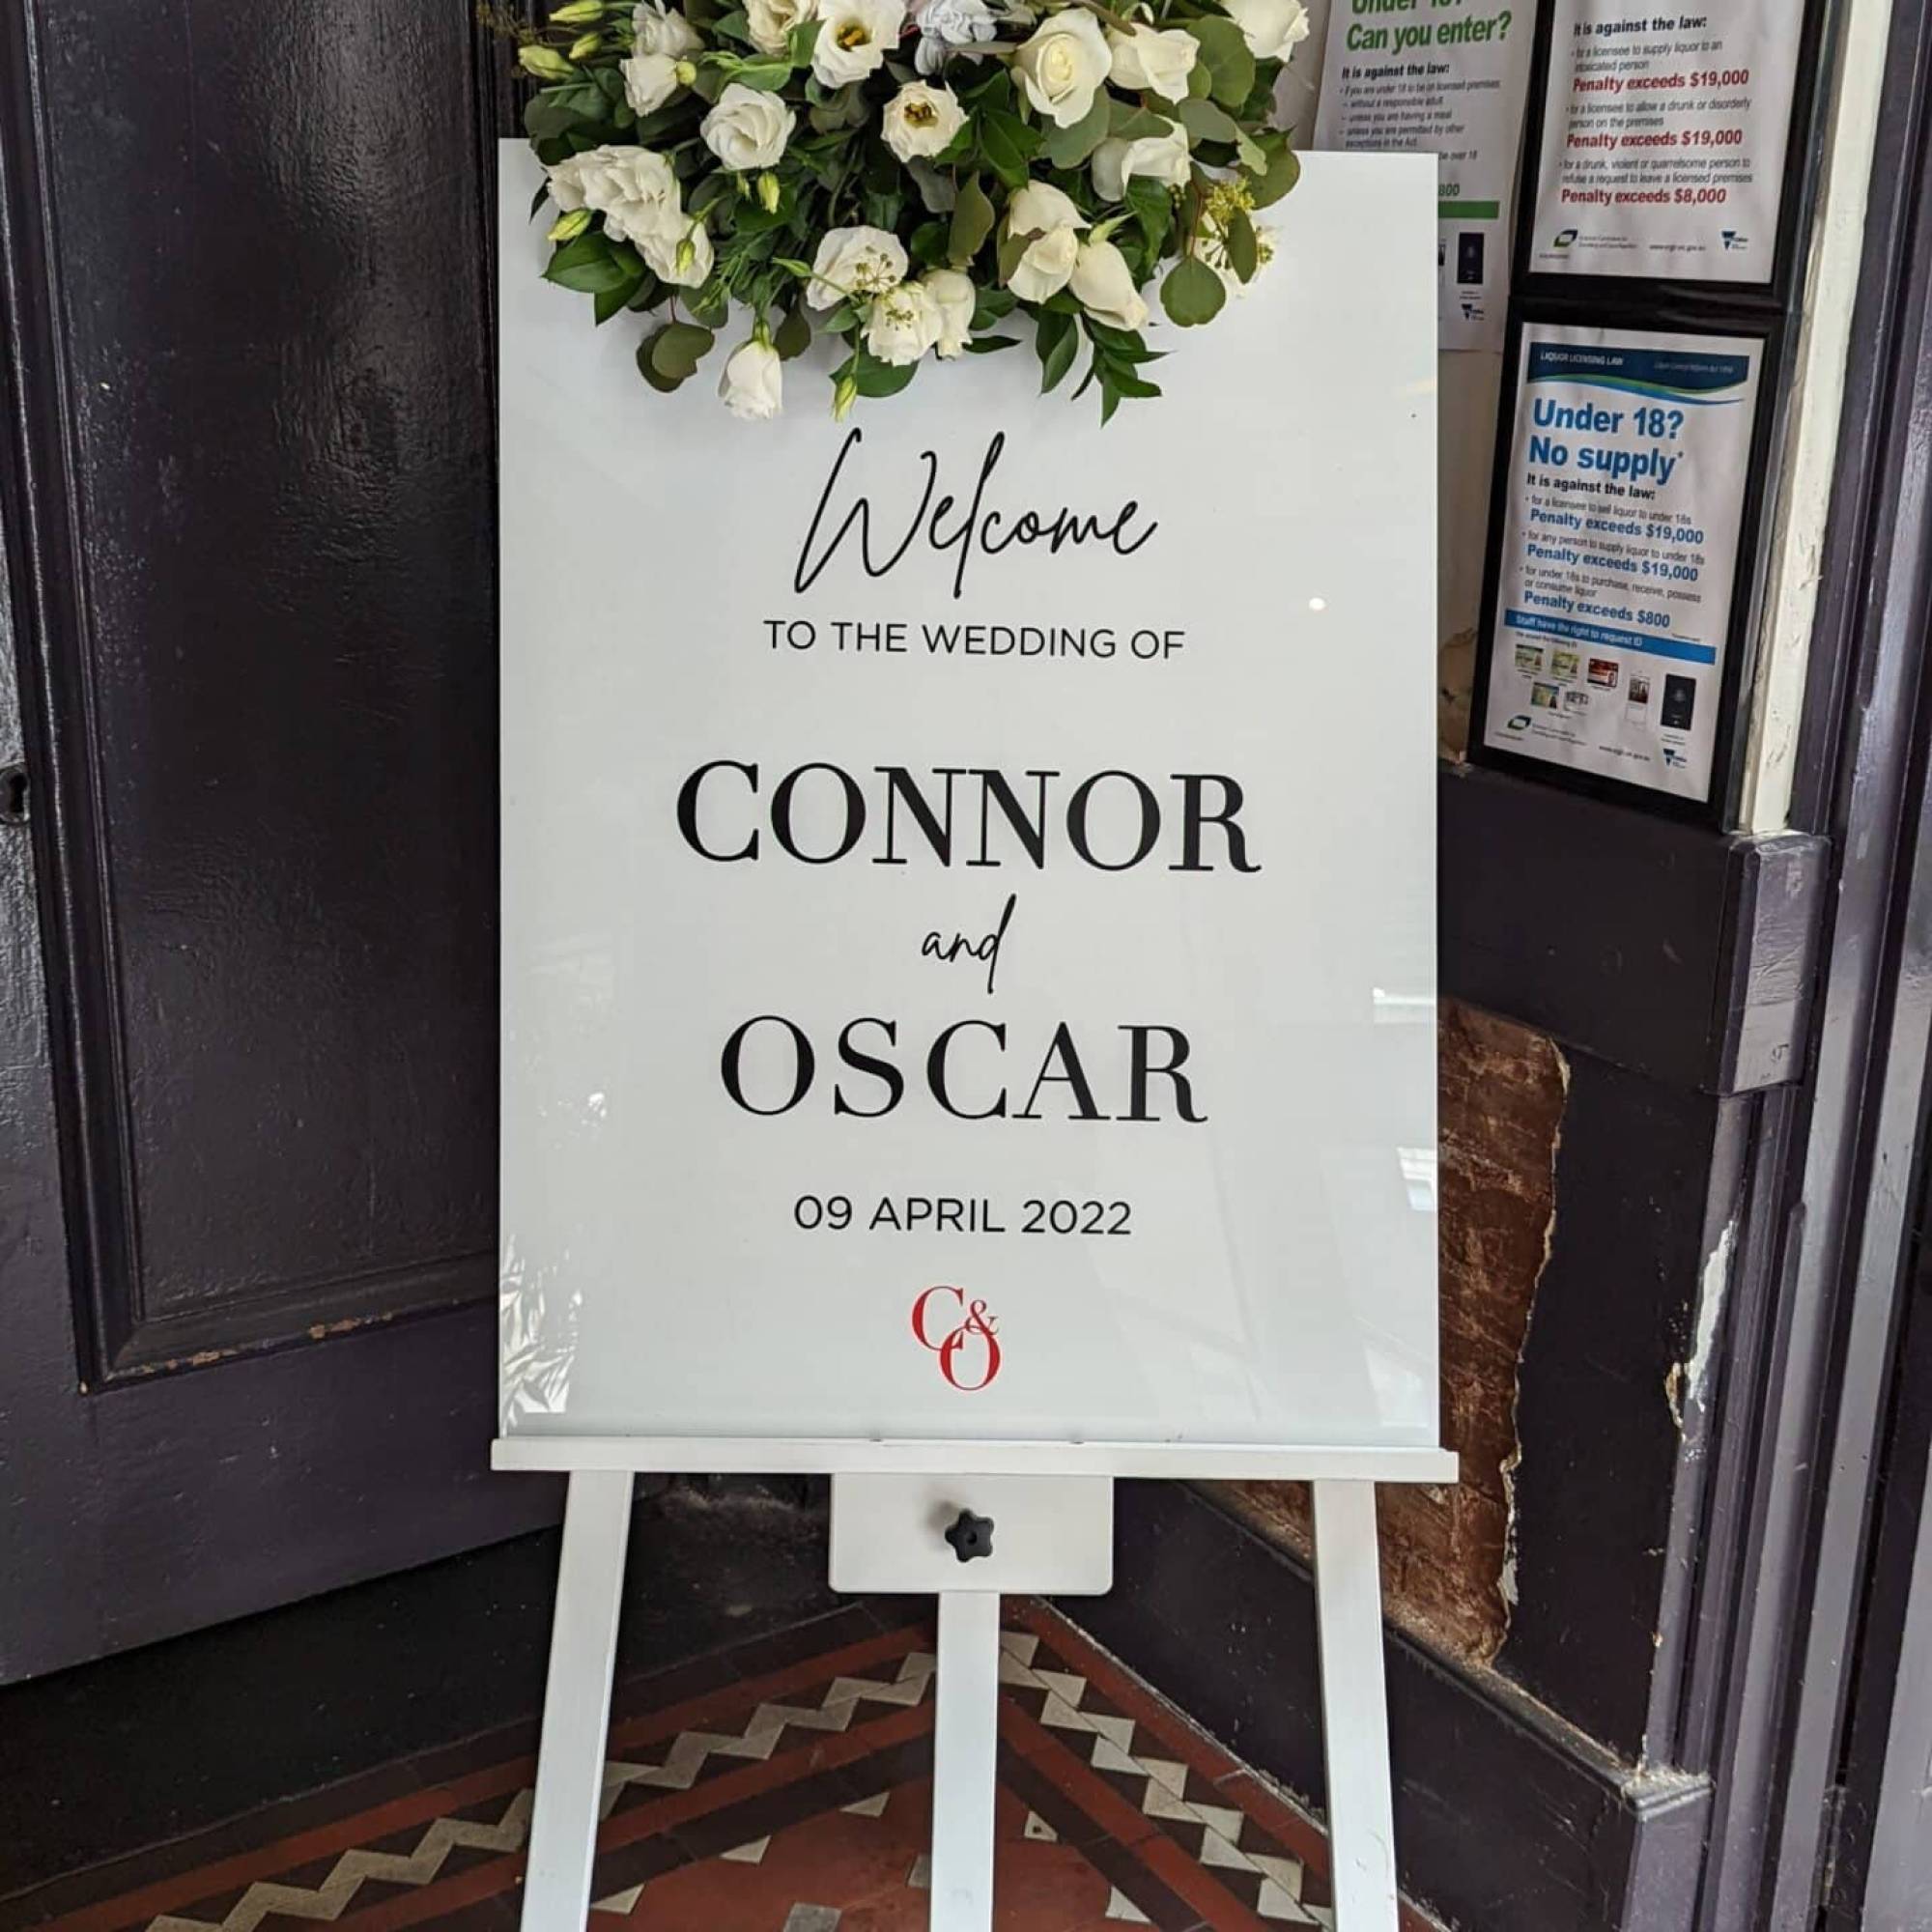
White acrylic on a timber easel, with a cluster of white blooms along the top edge.
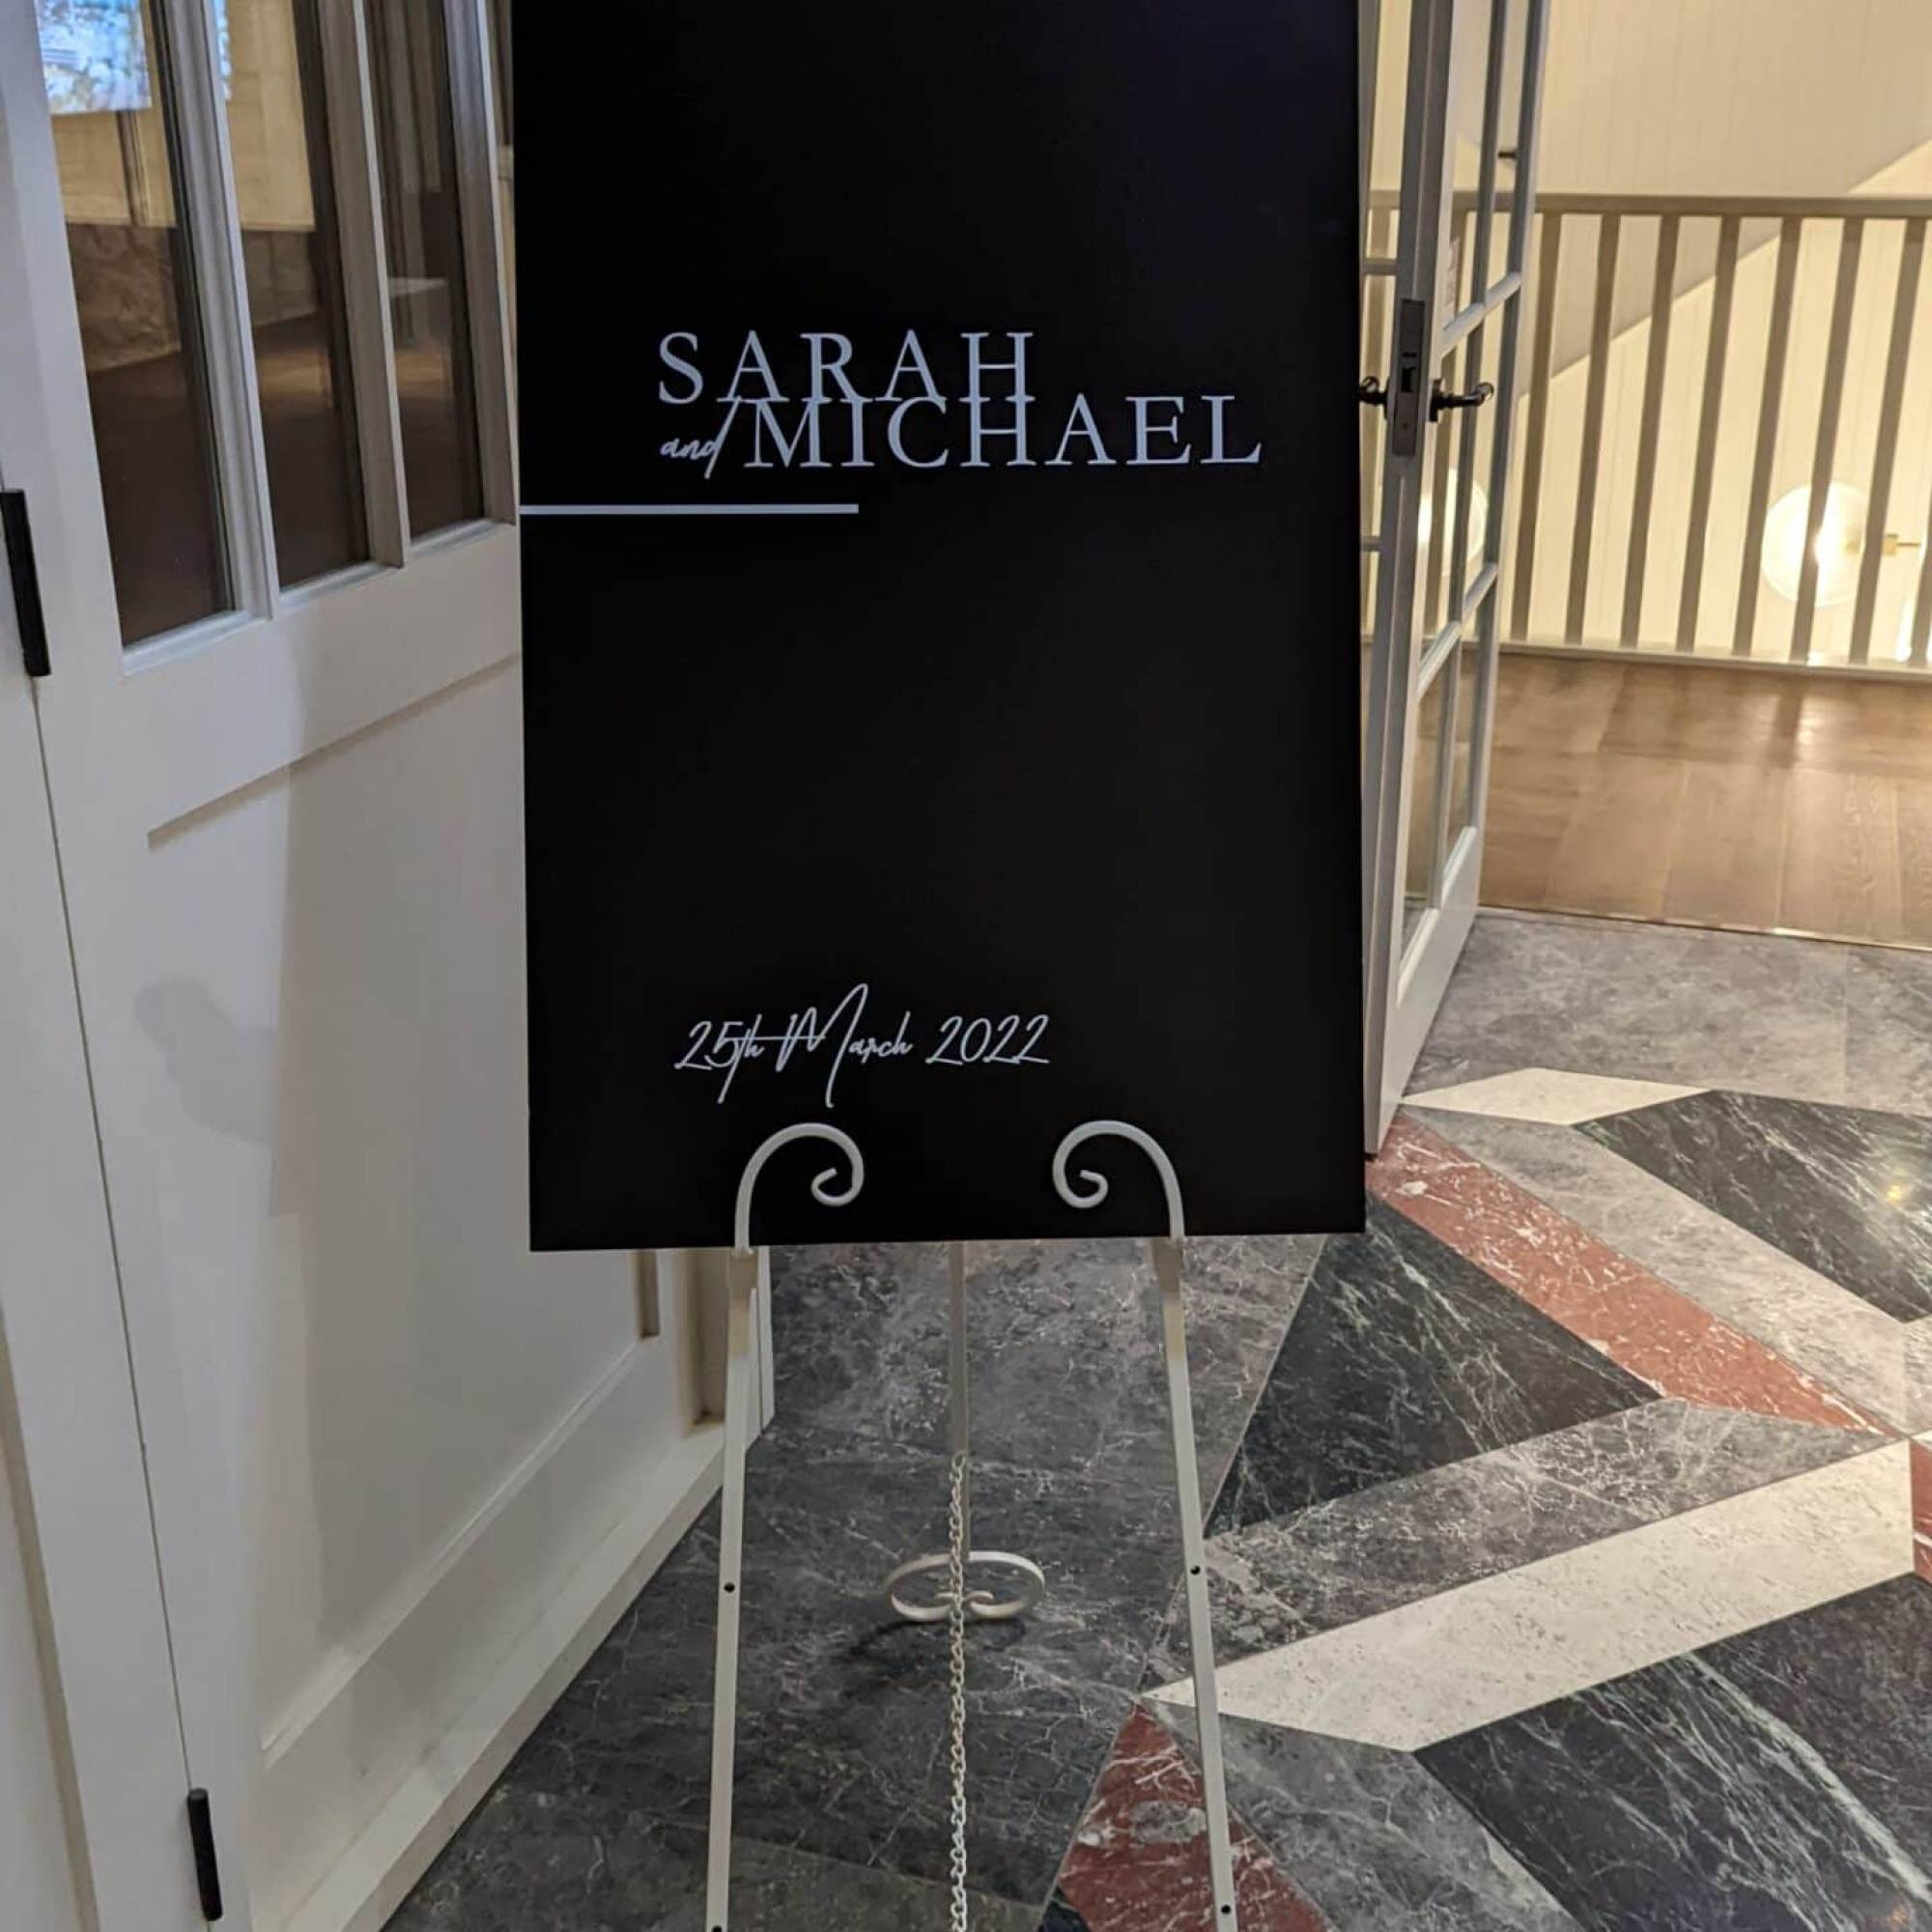
2. Black acrylic with white script
Black acrylic with white lettering feels formal and suits evening receptions and black-tie dress codes. A white metal easel with curled feet softens it.
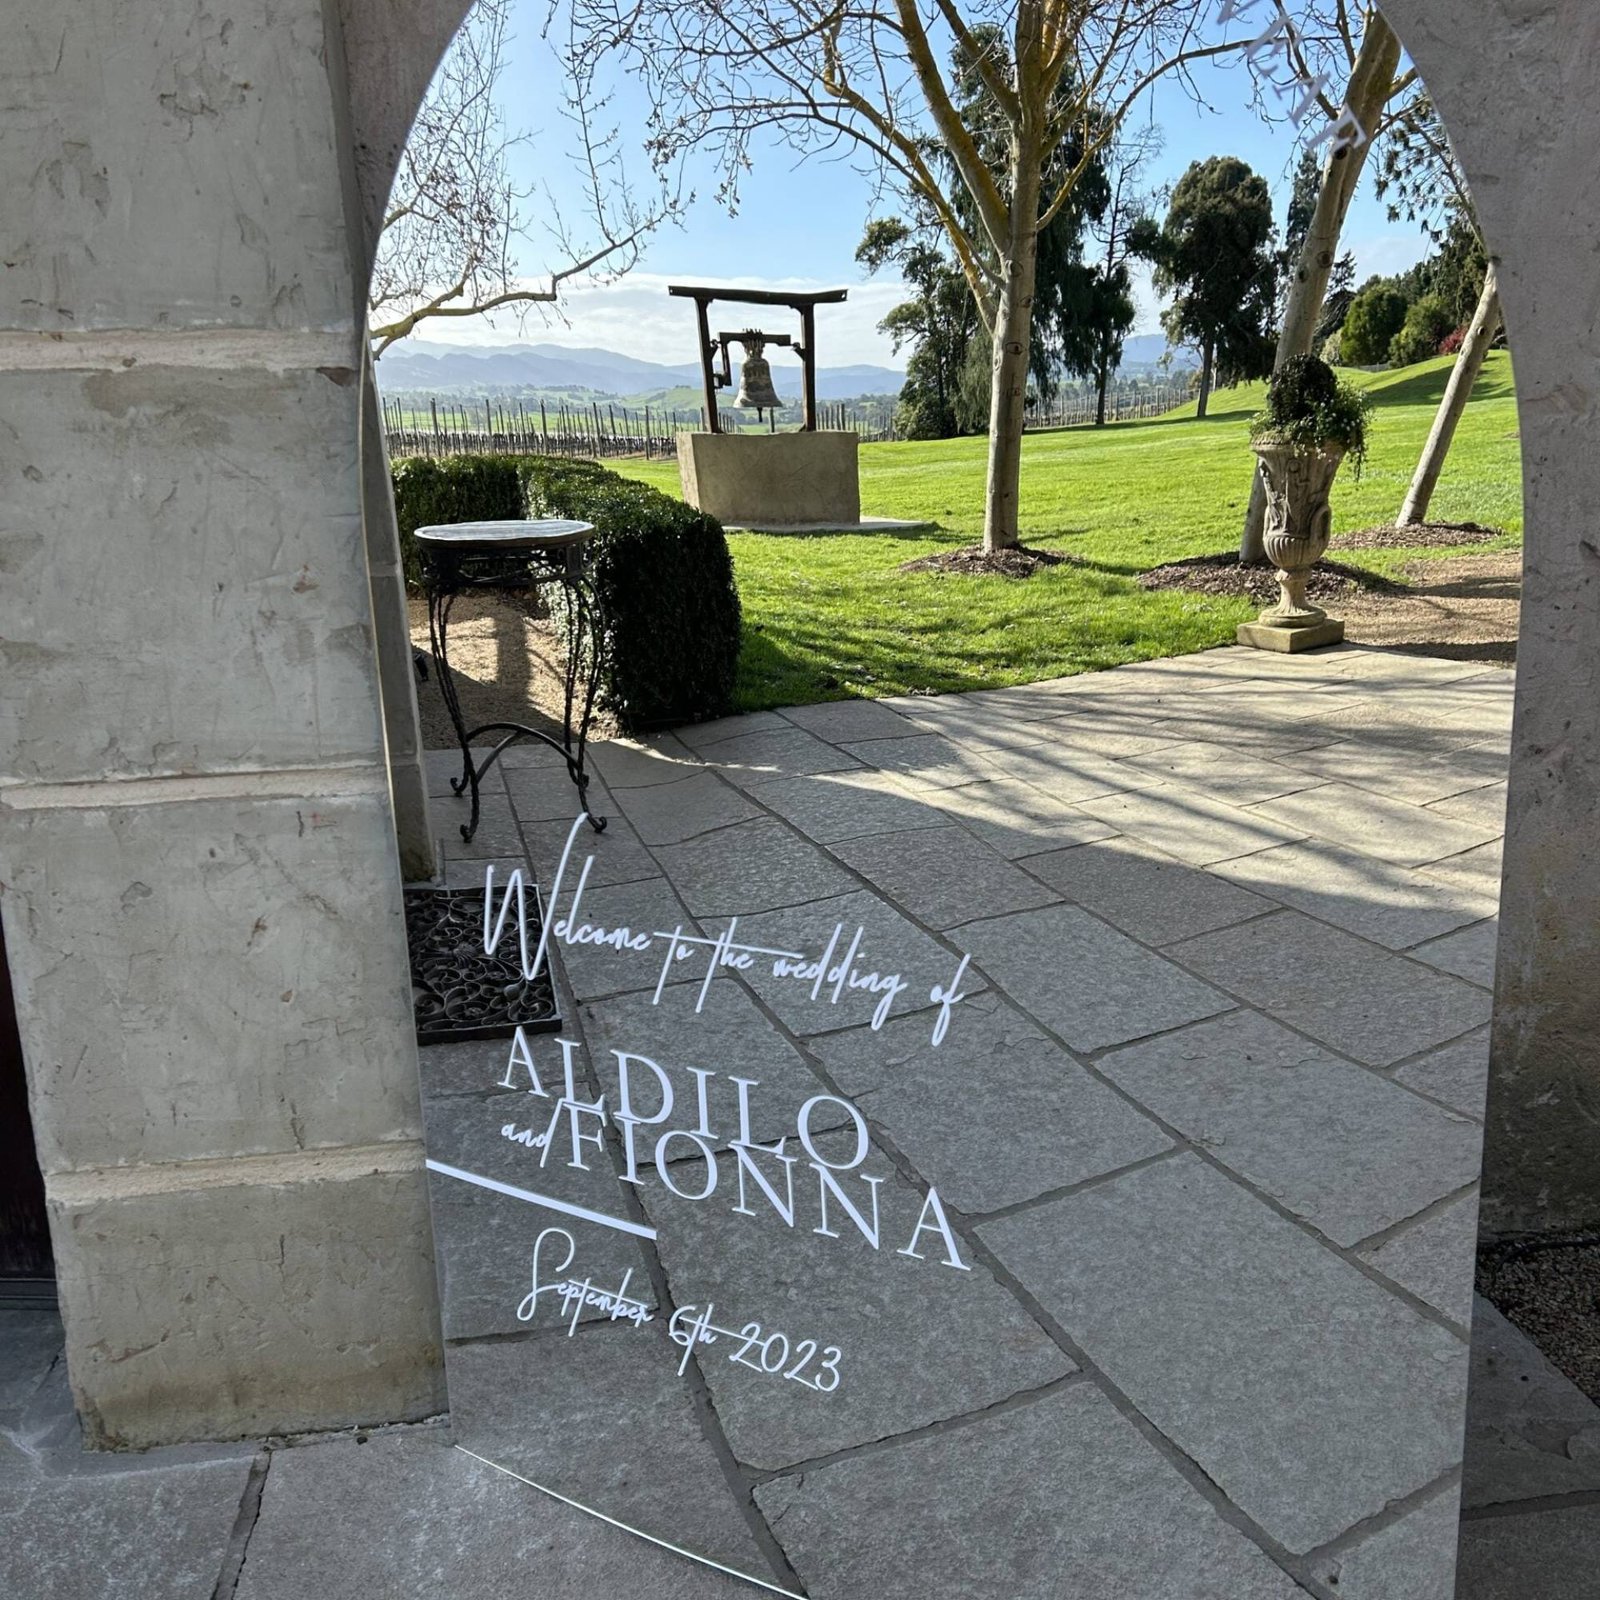
3. Clear acrylic in front of a view
If your entrance looks onto gardens or vineyard, clear acrylic lets the view show through the sign. It works best outdoors in daylight. At night, clear signs need a plain or lit backdrop or the lettering disappears.
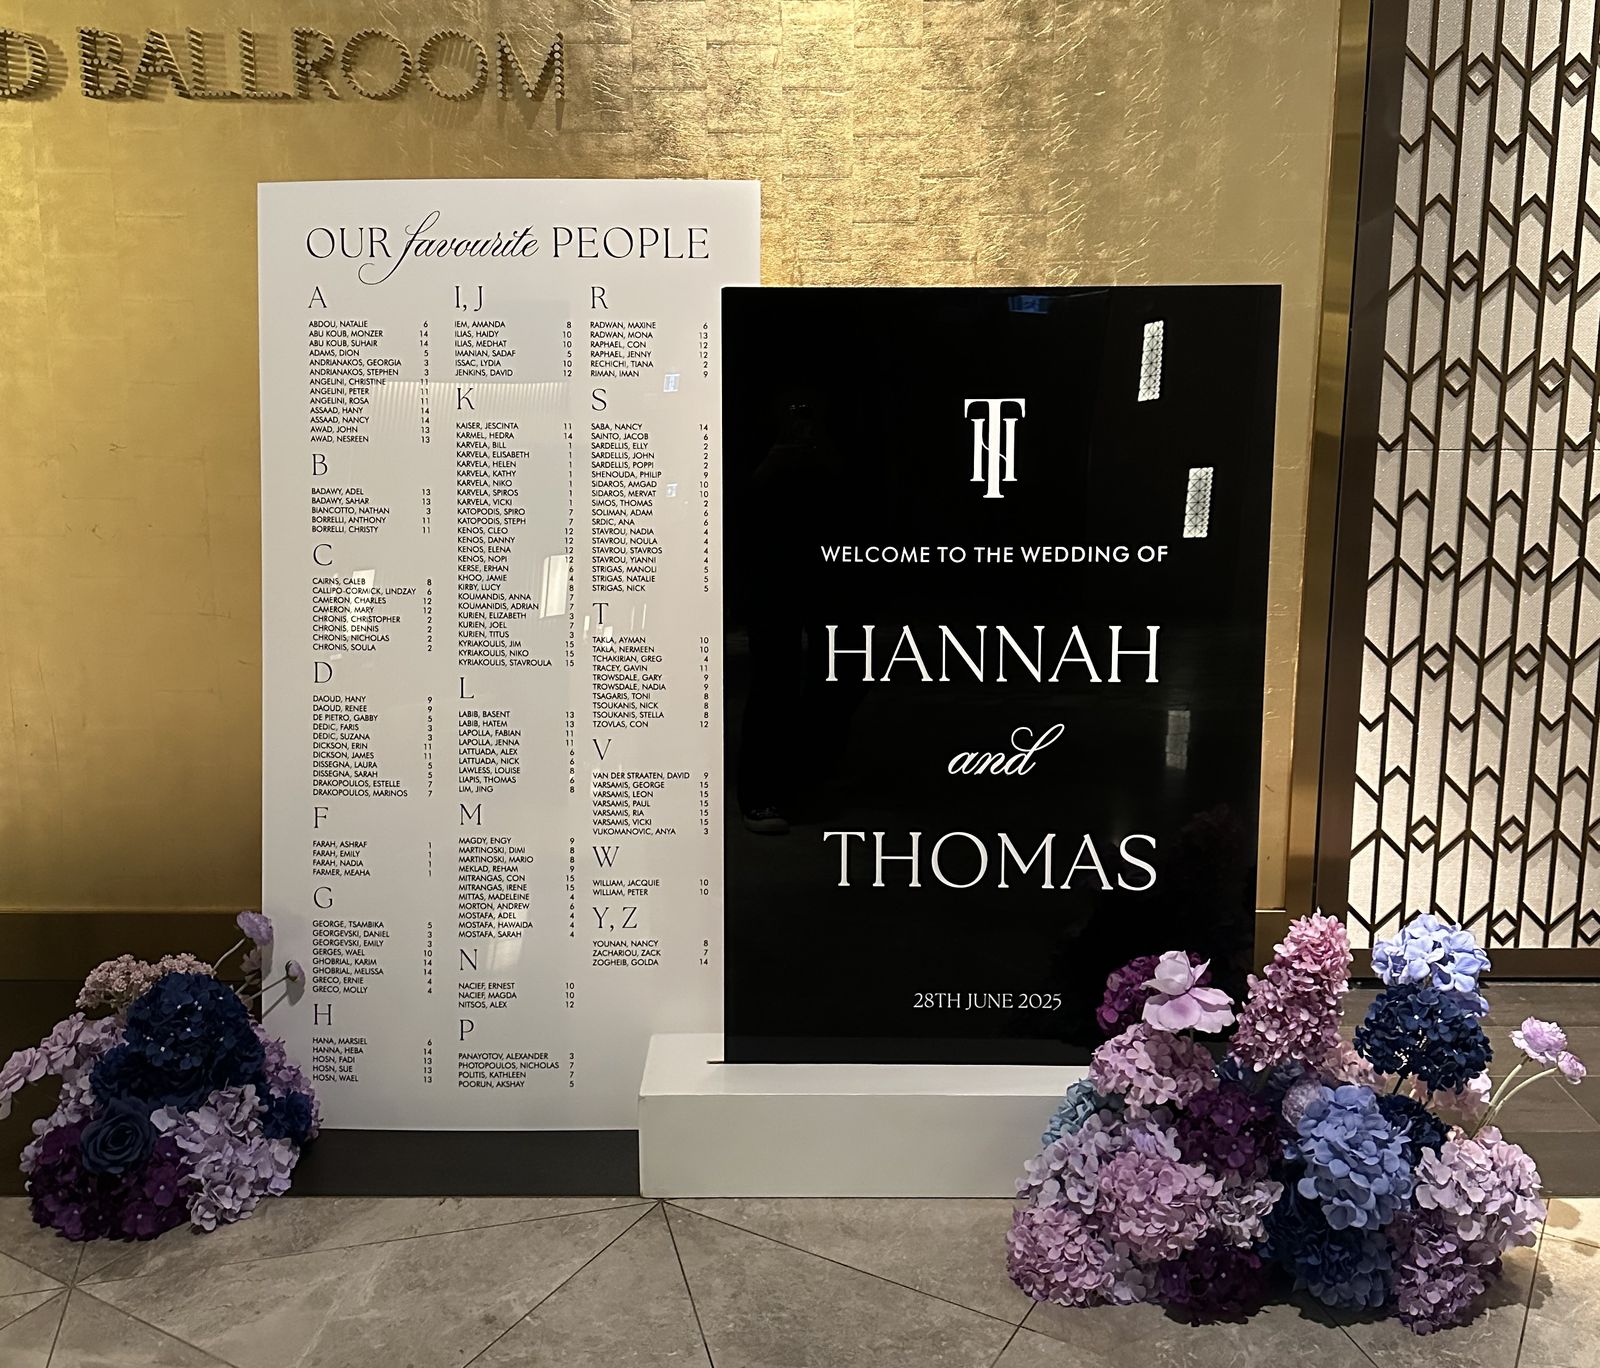
4. A monogram as the hero
Lead with your monogram, the same one from your invitations, then set the greeting and names underneath. It ties the welcome sign to the rest of your stationery straight away.
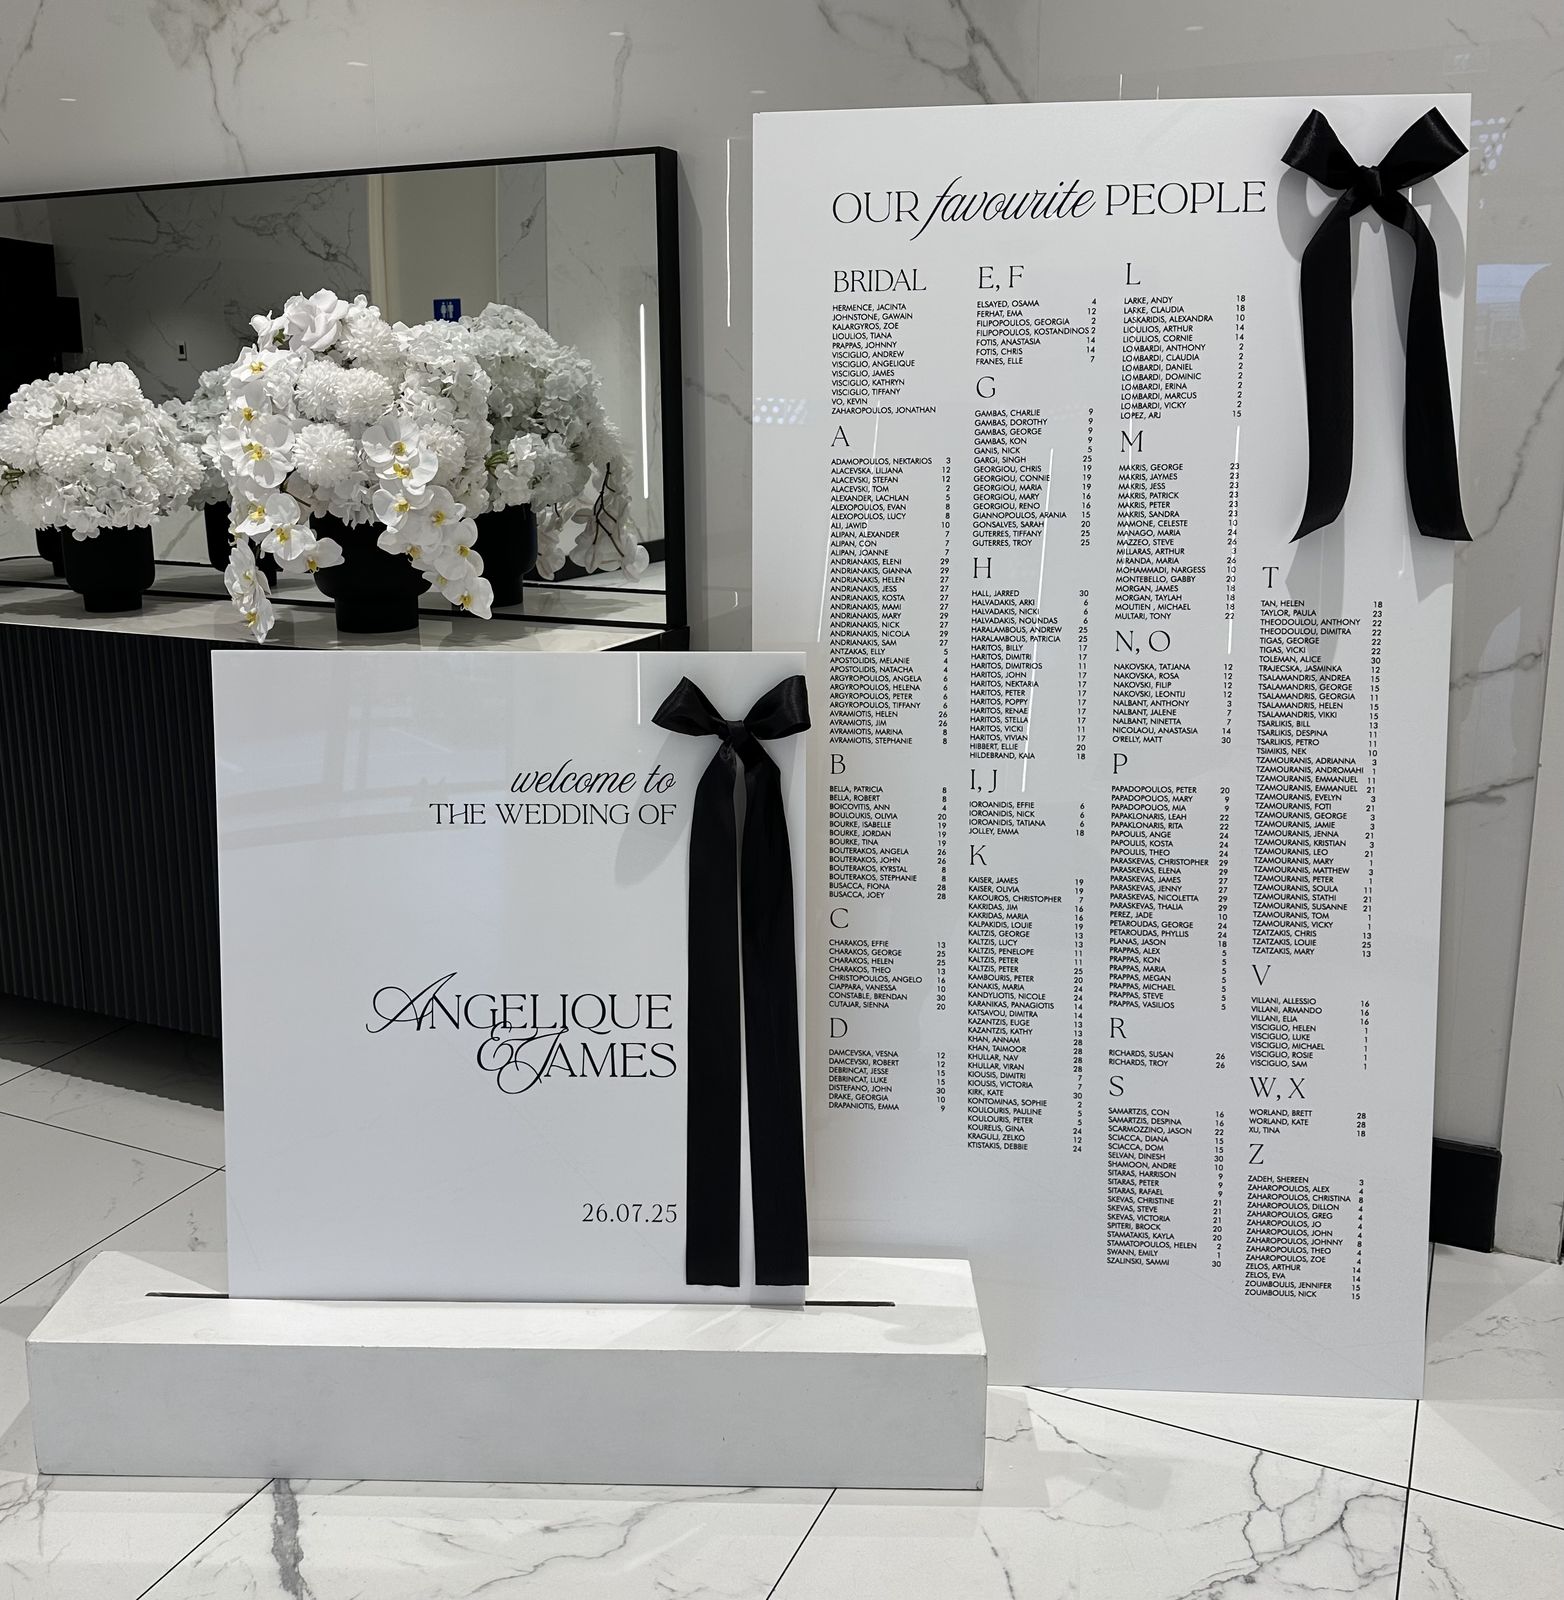
5. Velvet bows and a plinth
Oversized black velvet bows tied to the corner of a white sign are an easy way to add a fashion-led detail. Standing the sign on a low white plinth lifts it to eye level without an easel.
Mirror welcome sign ideas
Mirror acrylic comes in gold, silver or rose. It glows in candlelight and low light, which is why it is a favourite for evening receptions. For a full guide to legibility and styling, see our post on mirror wedding signs.
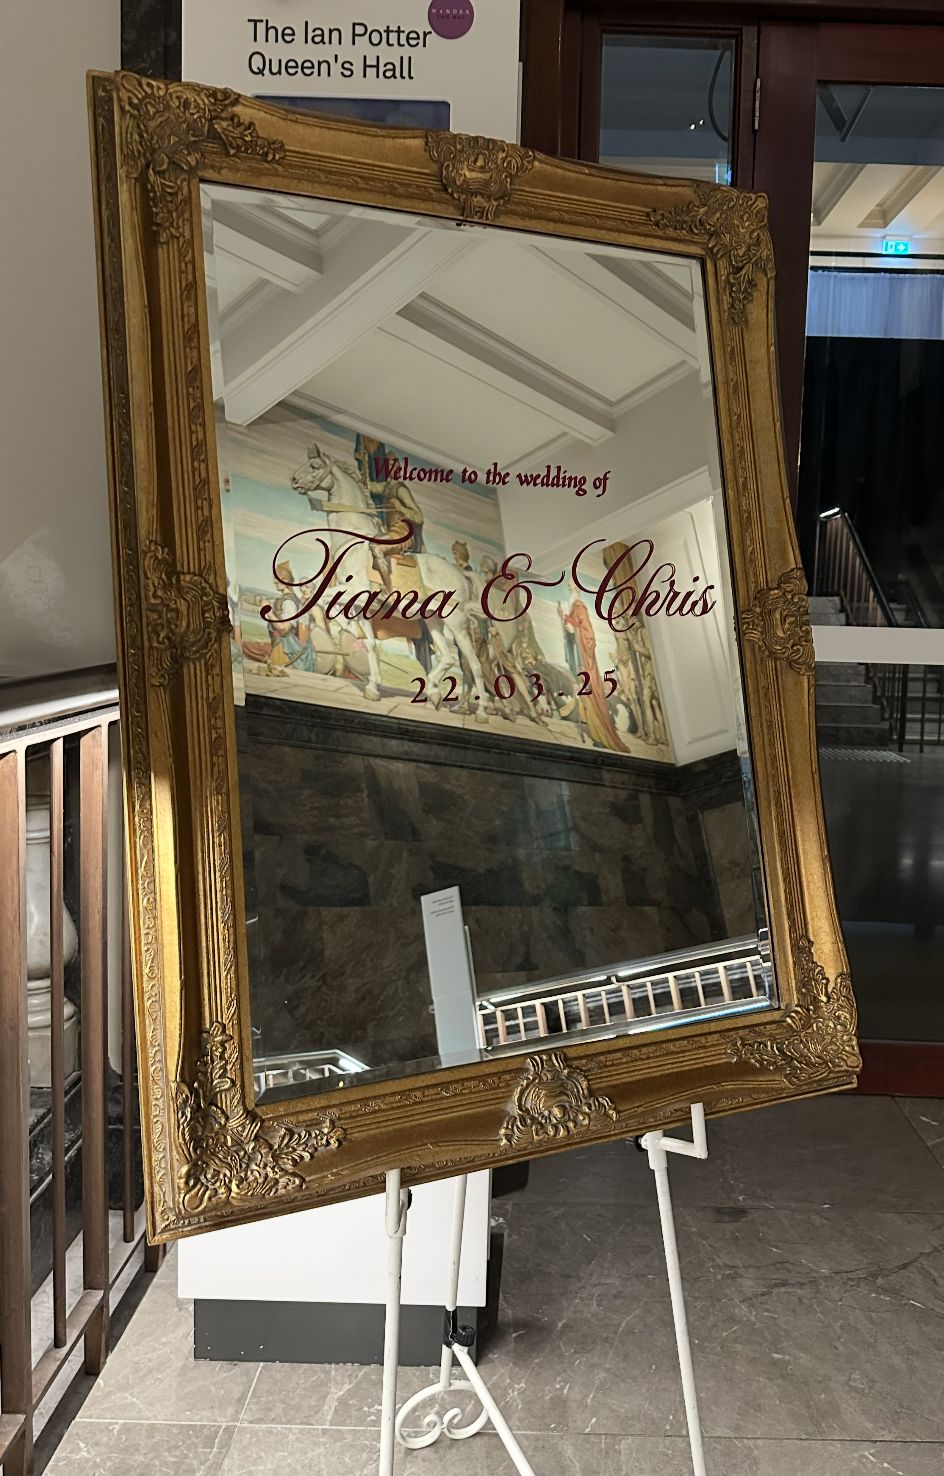
6. A gilded frame
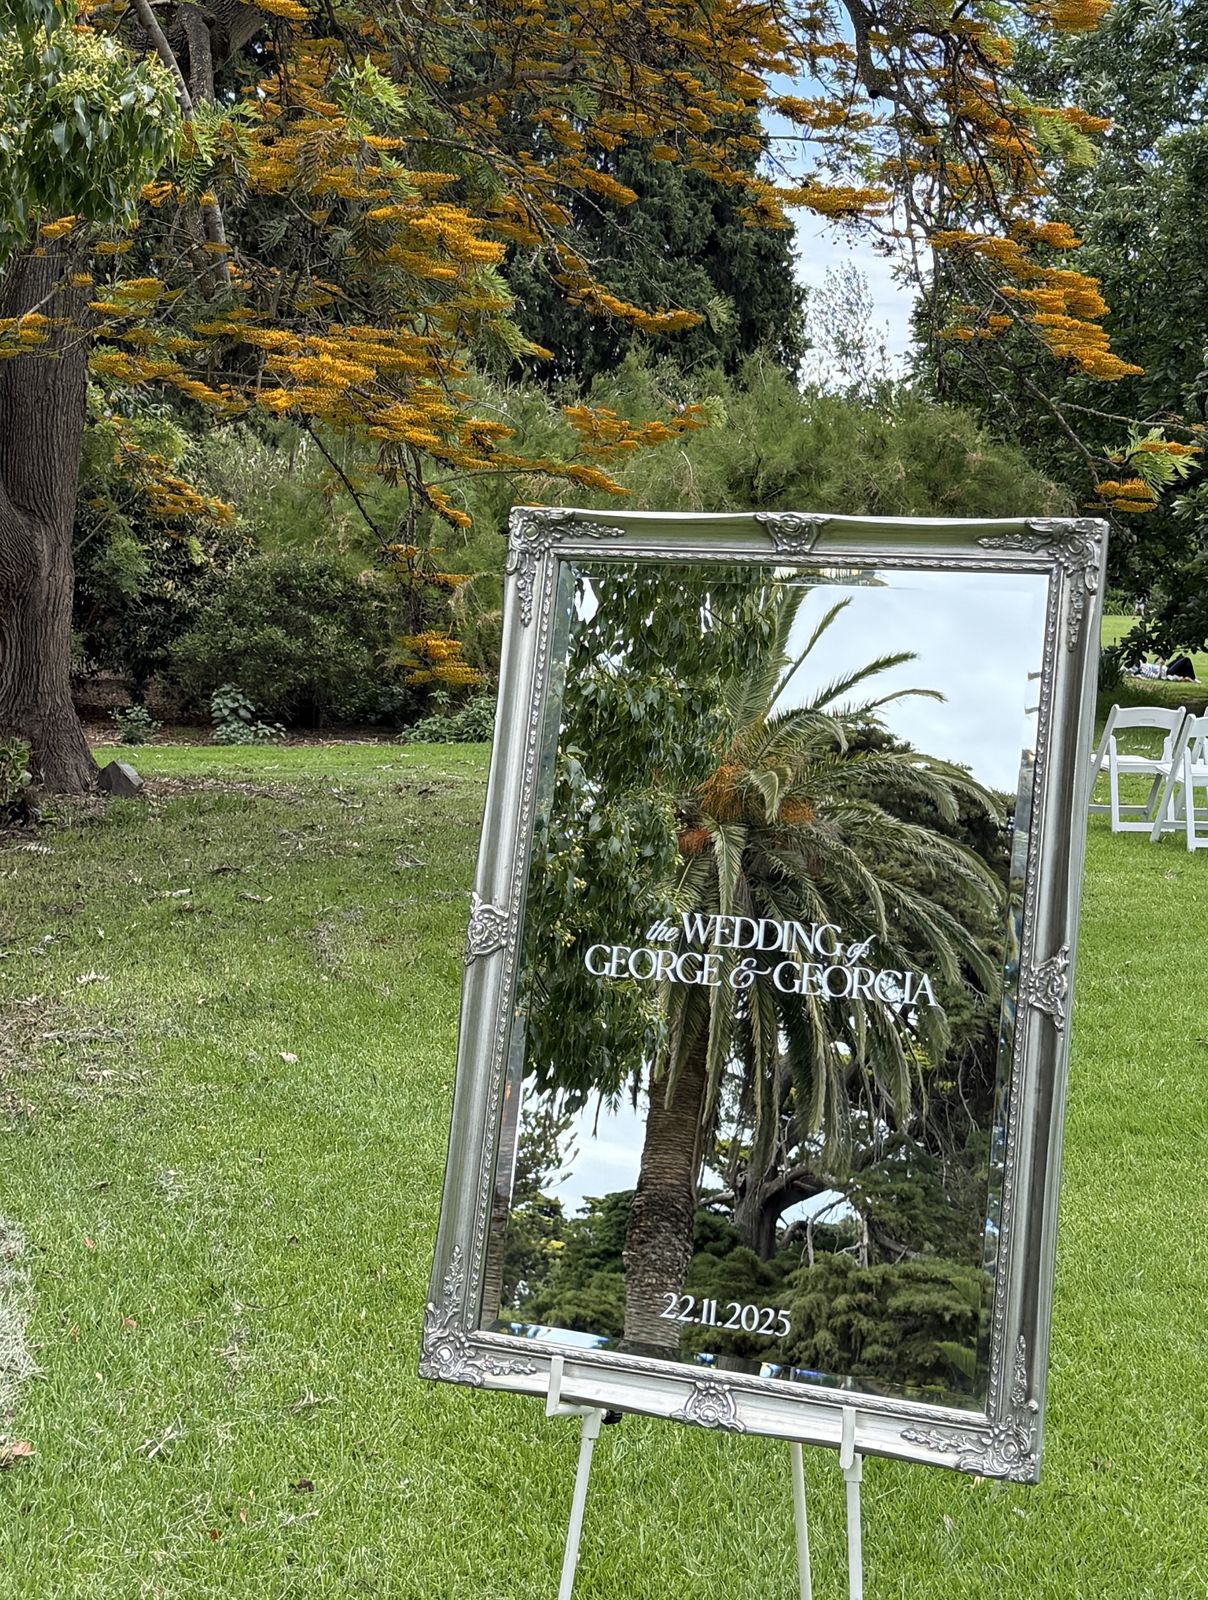
An ornate gold frame around a mirror sign gives a vintage, almost gallery-like feel. Coloured script lettering (here, burgundy) keeps the wording readable against the reflection.
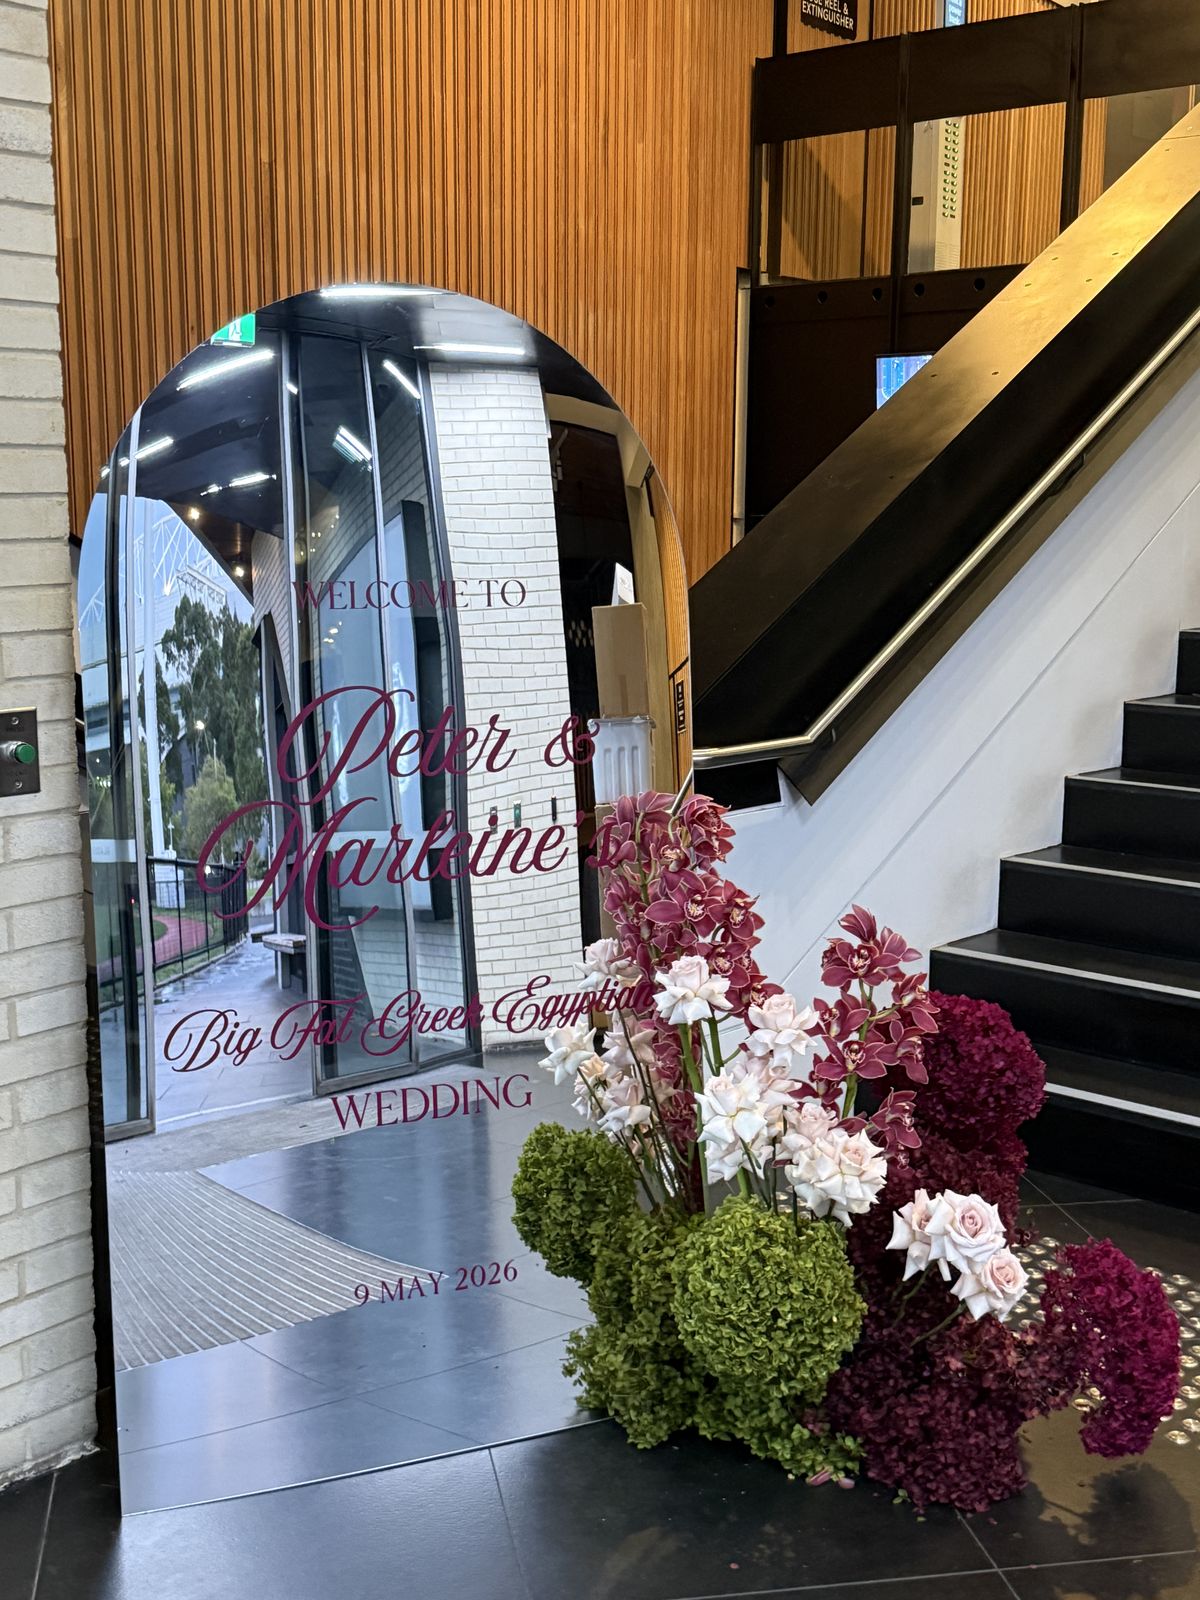
7. A mirror arch with a personality line
A mirror arch with lettering in your accent colour, plus one line that sounds like you. This couple added the words “Big Fat Greek Egyptian Wedding” under their names, which tells guests exactly what kind of night they are in for.
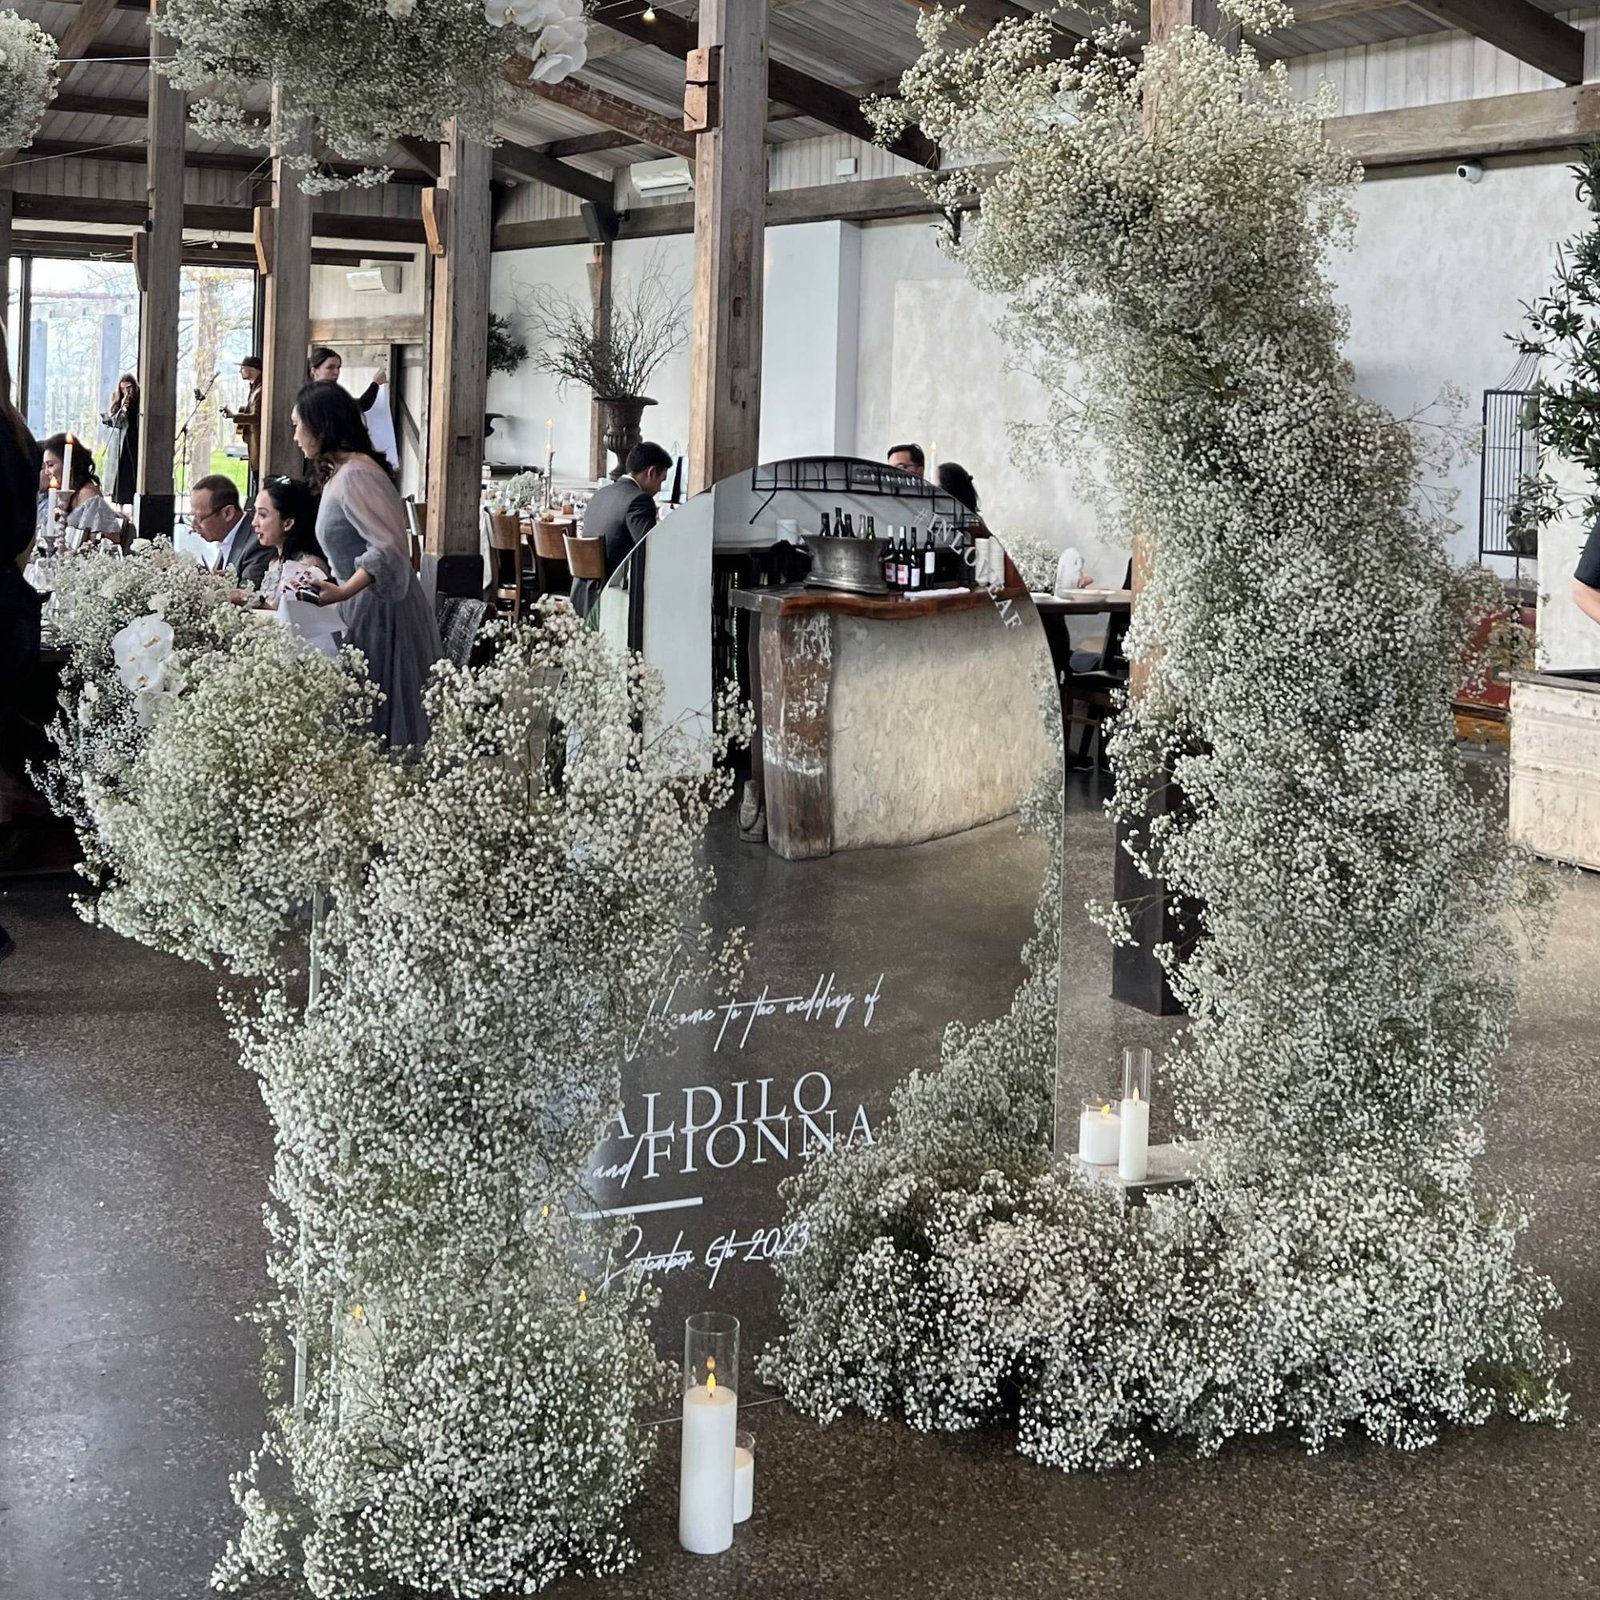
8. Mirror framed in baby’s breath
Florists can build an installation around a mirror sign. A dense frame of baby’s breath turns the sign into a photo spot as guests arrive.
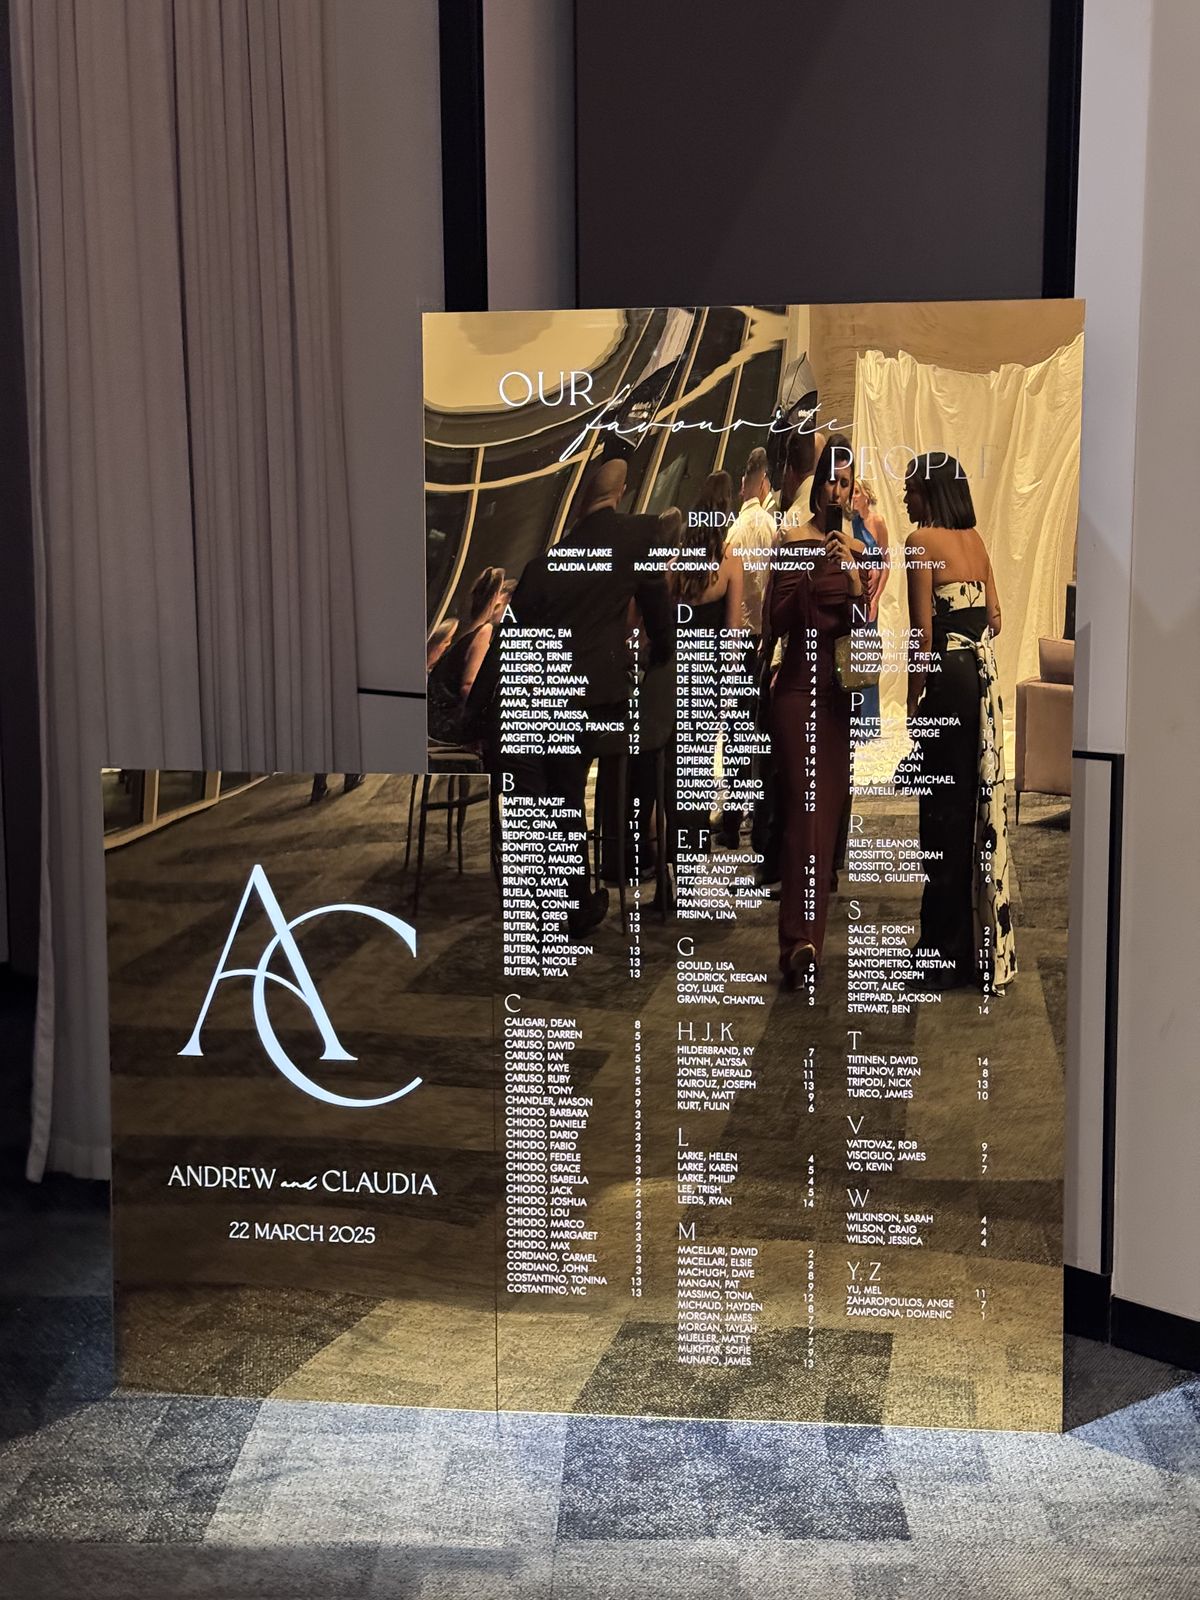
9. A monogram that doubles as the seating chart
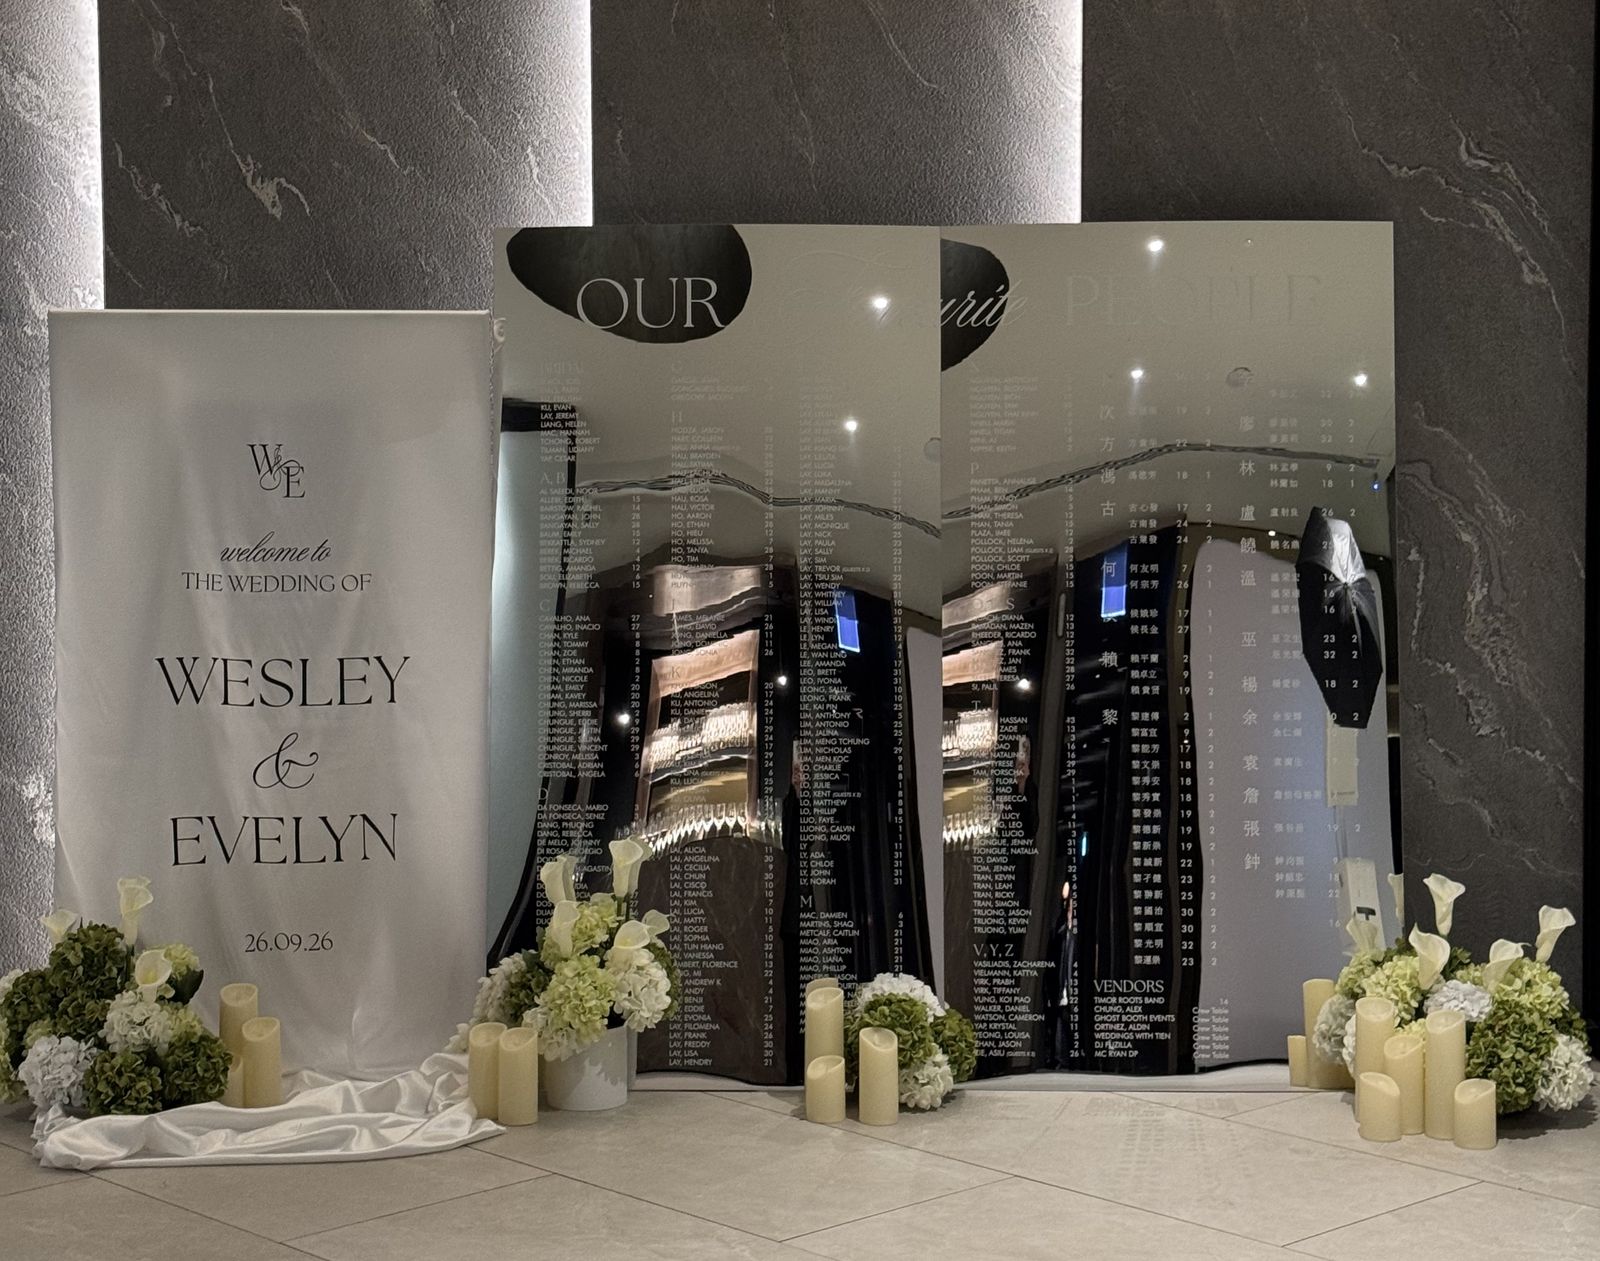
Overlap two gold mirror panels: the lower panel carries a large monogram and your names, the upper one carries the seating chart. One piece does two jobs, which helps at venues with a small foyer.
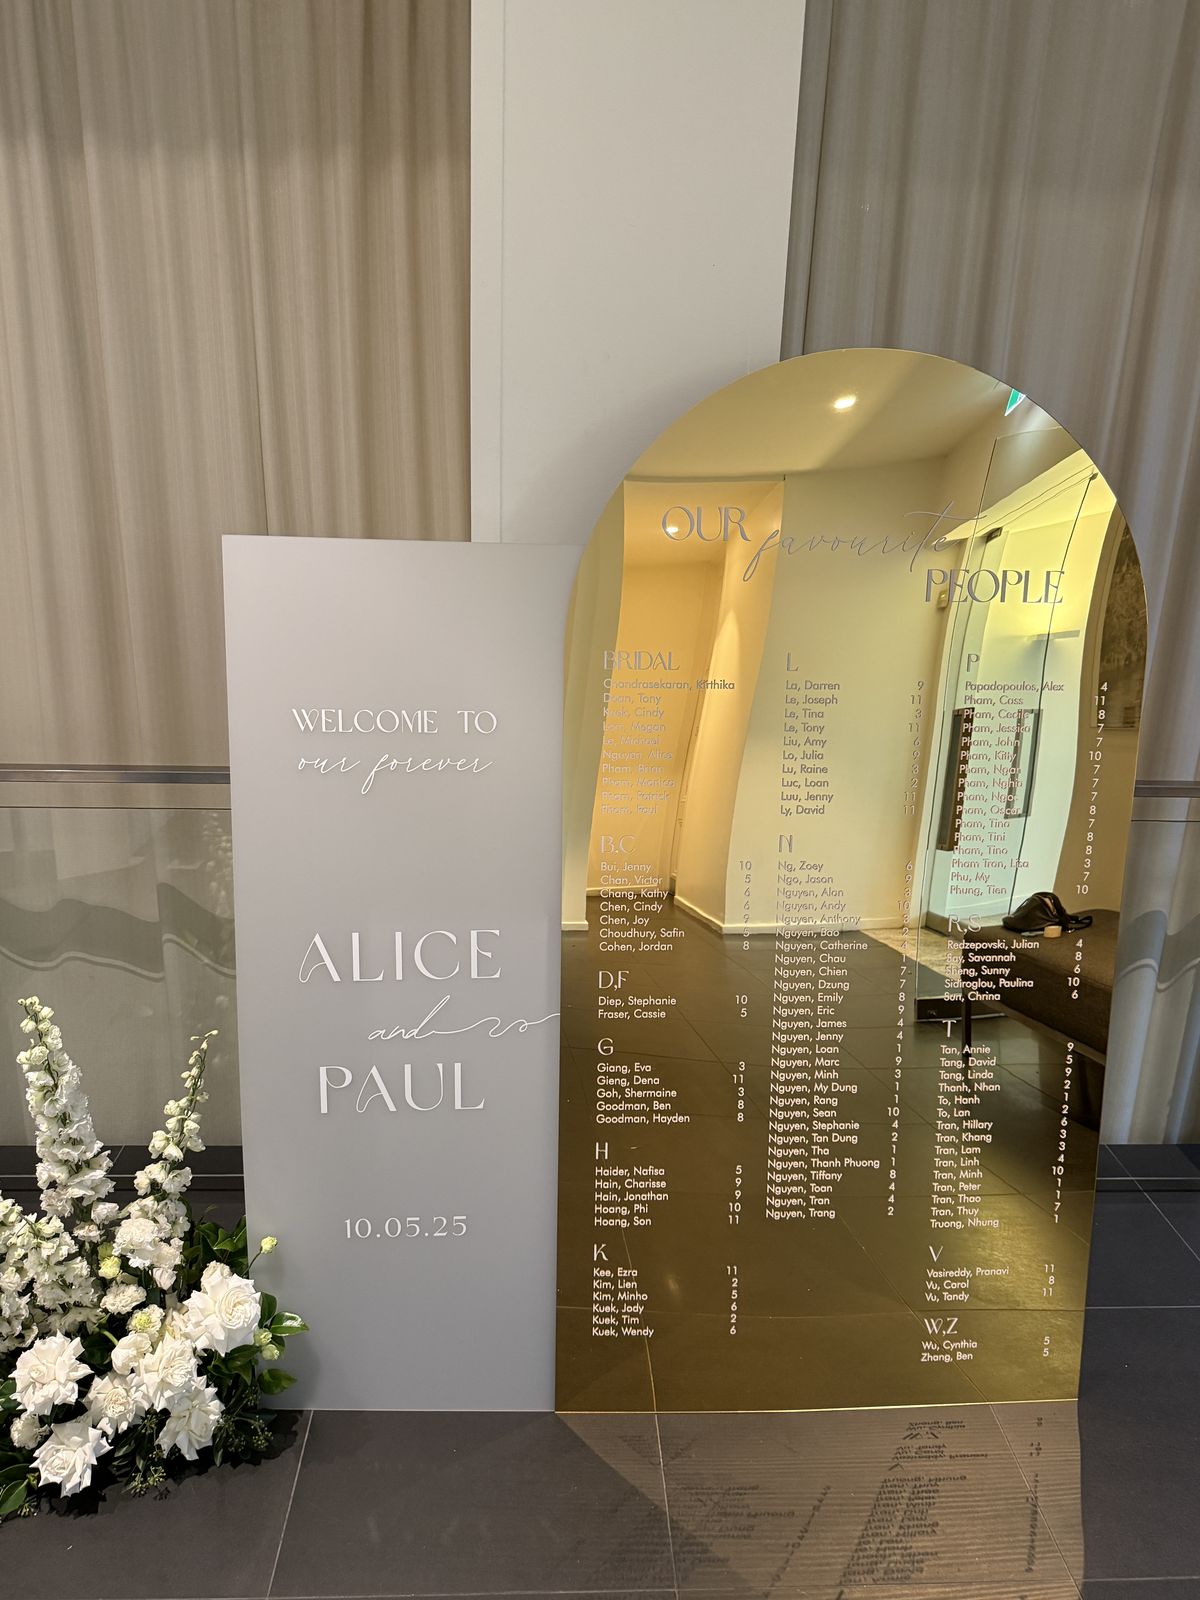
10. A frosted panel beside a mirror arch
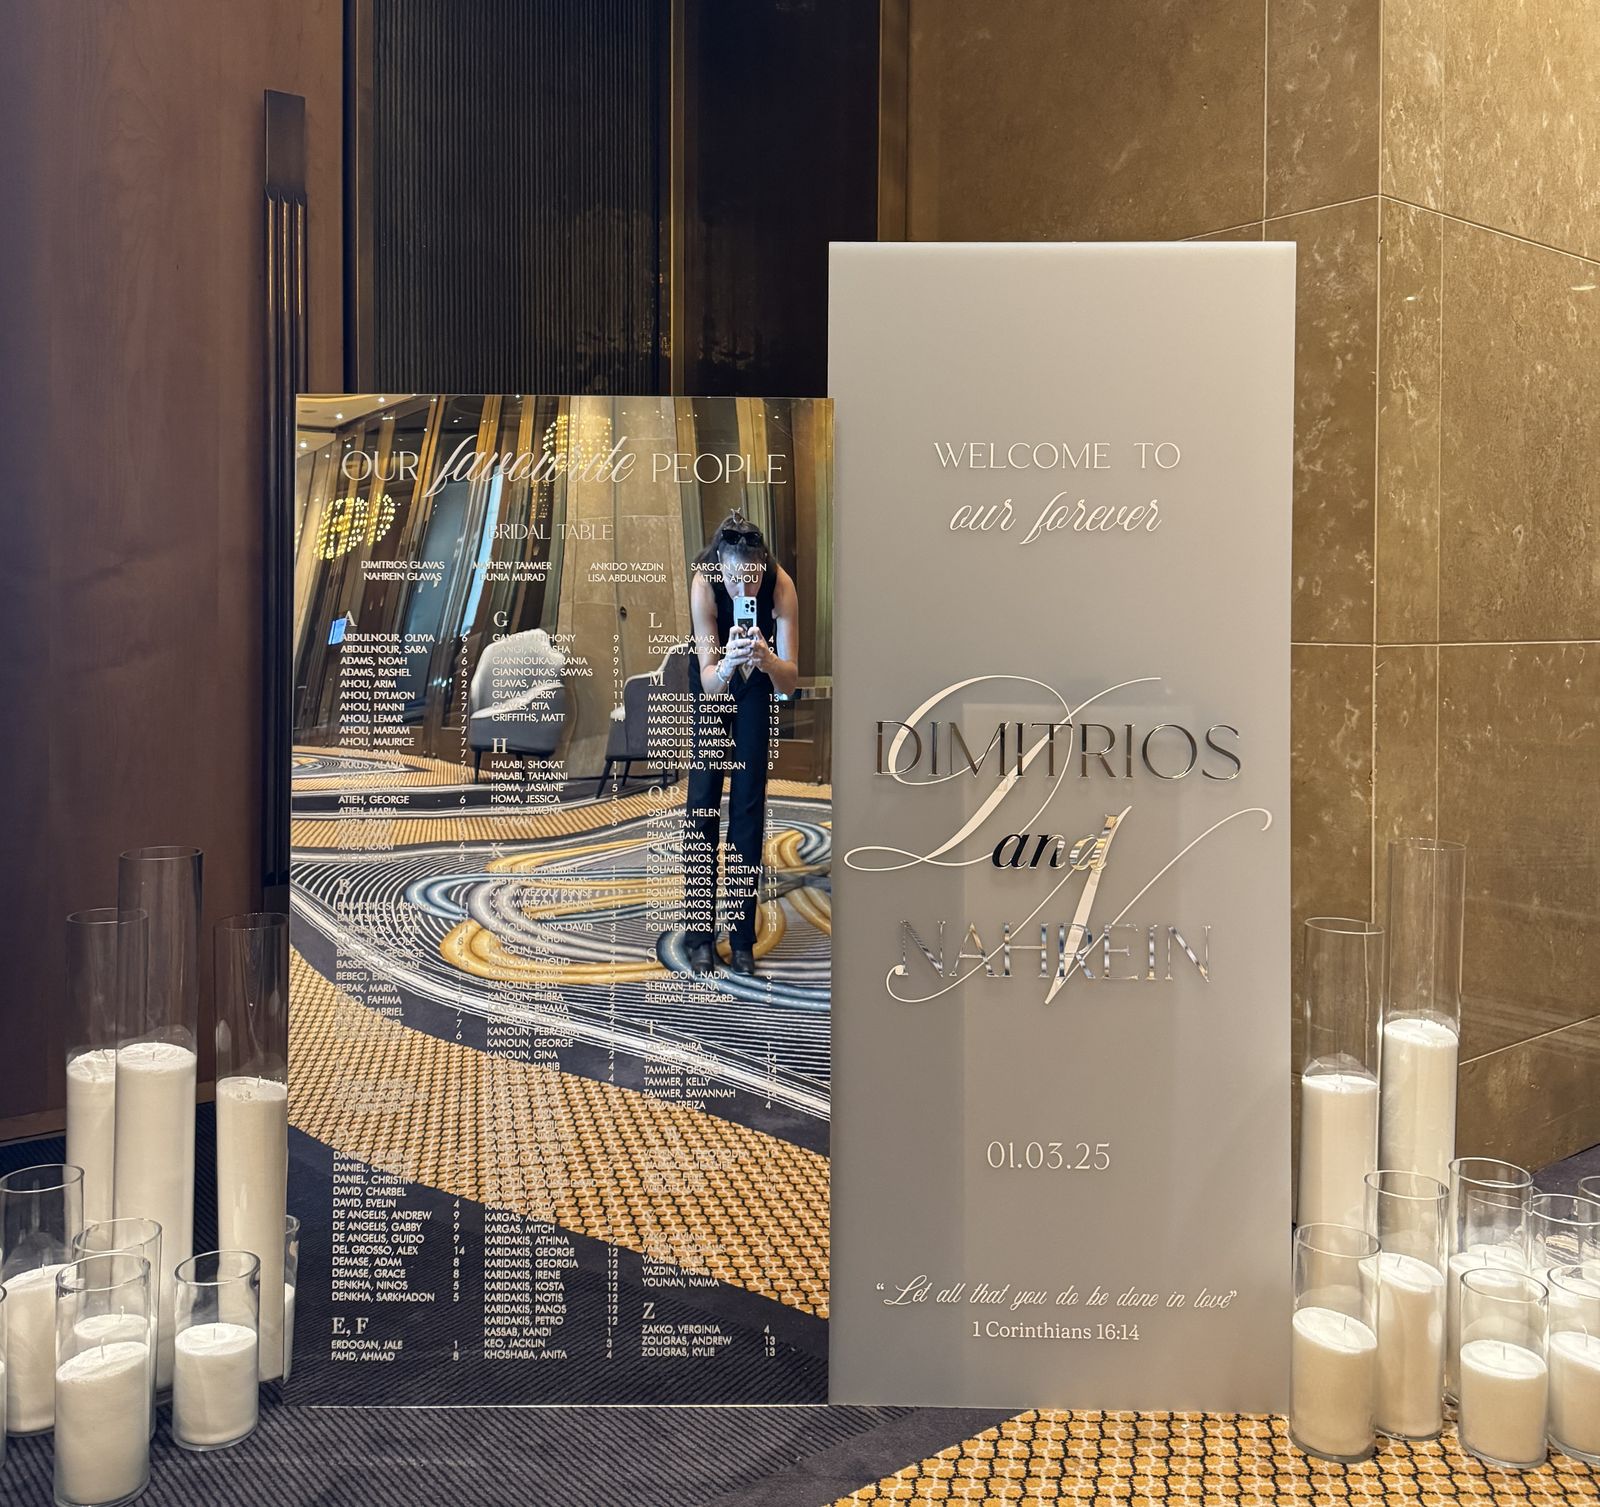
Frosted acrylic does not reflect, so it makes a calm reading surface next to a mirror piece. Here the frosted panel carries “Welcome to our forever” and the names, while the gold mirror arch beside it holds the seating chart.
Satin and linen welcome sign ideas
Fabric signs are soft, have no glare and photograph well in any light. Every Ghost Booth Events satin sign is handmade in house, with each letter placed and heat pressed by hand.
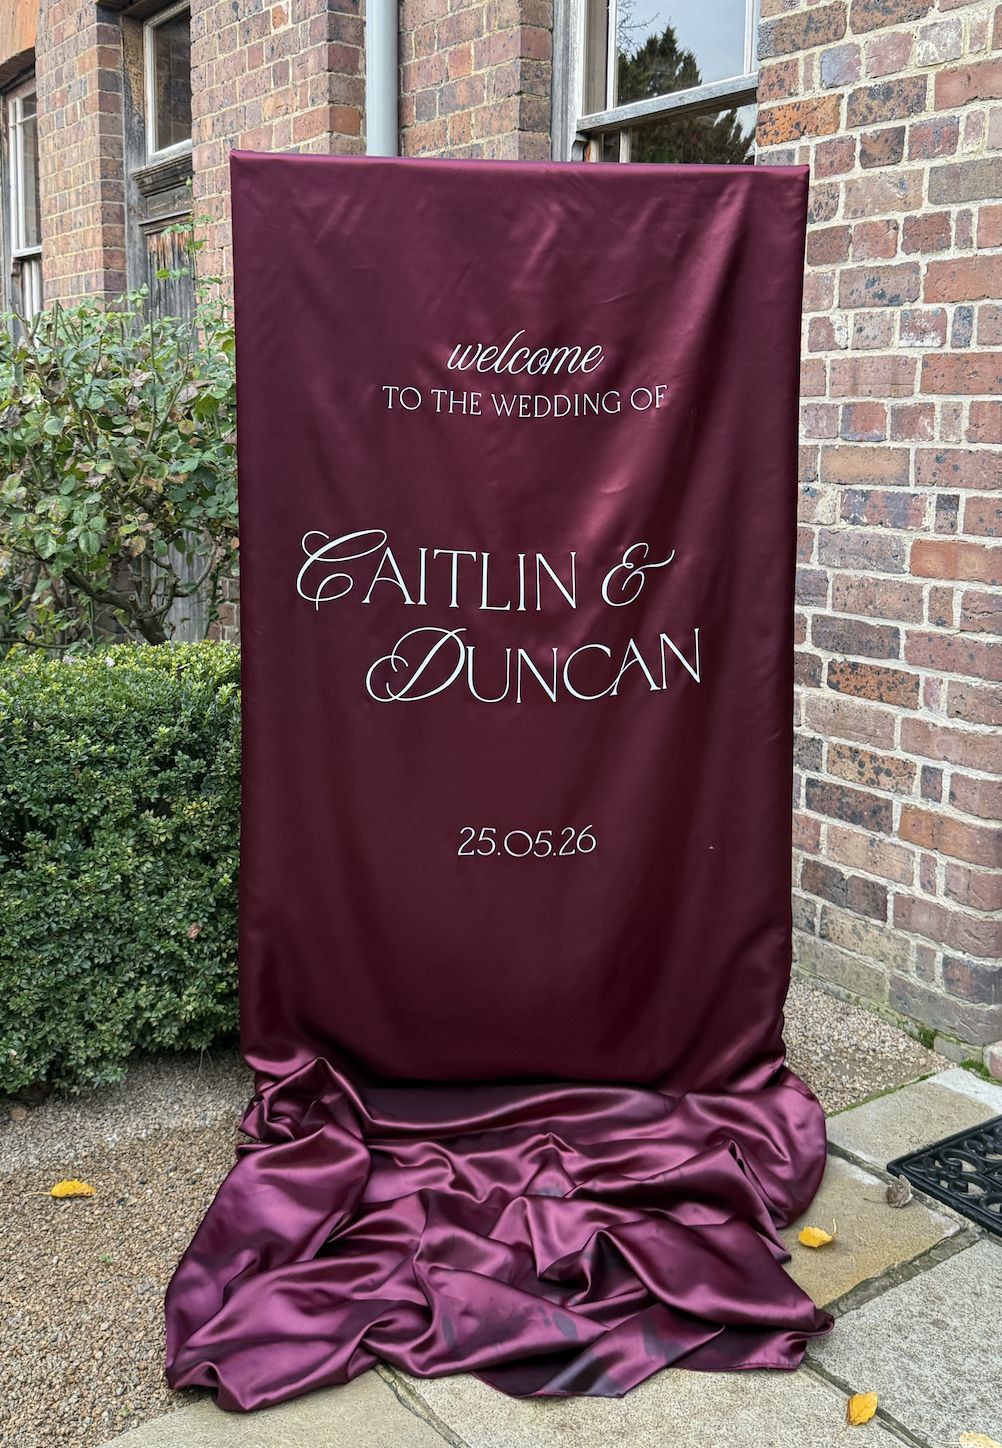
11. Satin pooled onto the floor
Let a satin sign run long so the fabric pools on the ground. It looks lavish and hides the base of the stand completely.
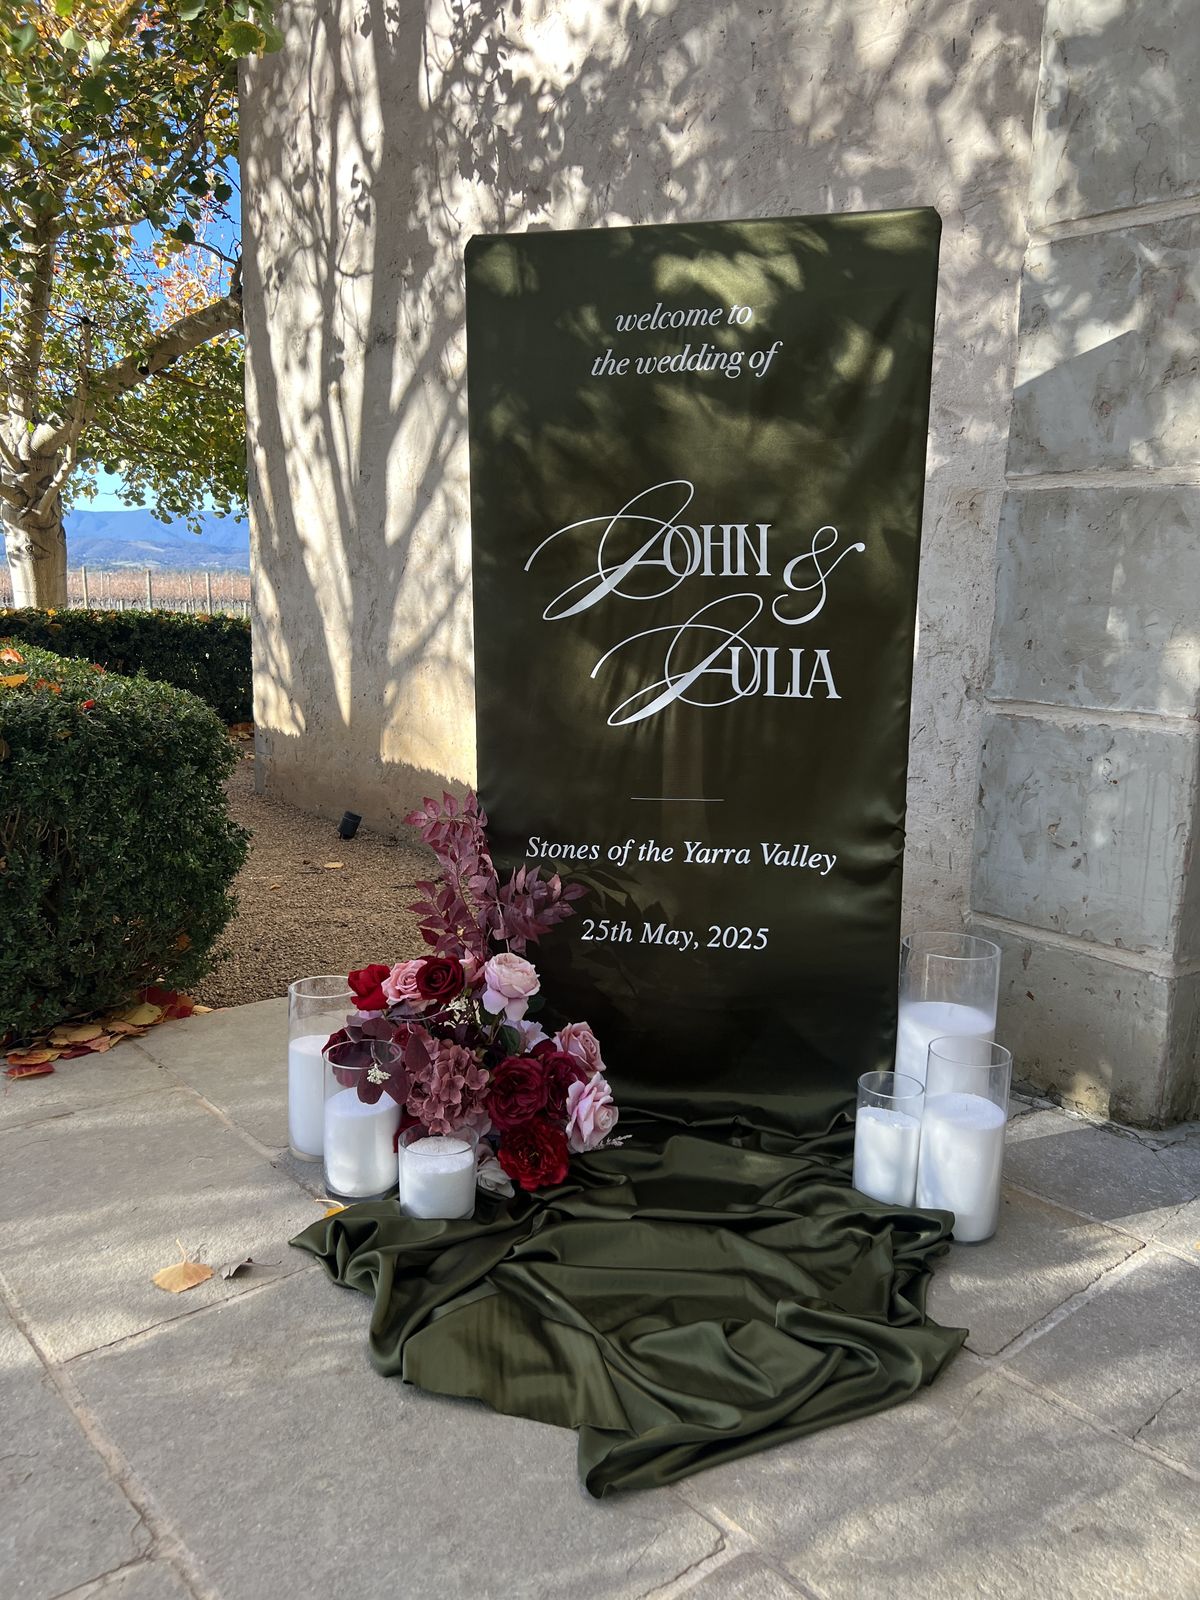
12. Olive satin with the venue name
Deep olive is a good alternative to burgundy for winery weddings. Adding the venue name under your names gives guests confirmation they are in the right place.
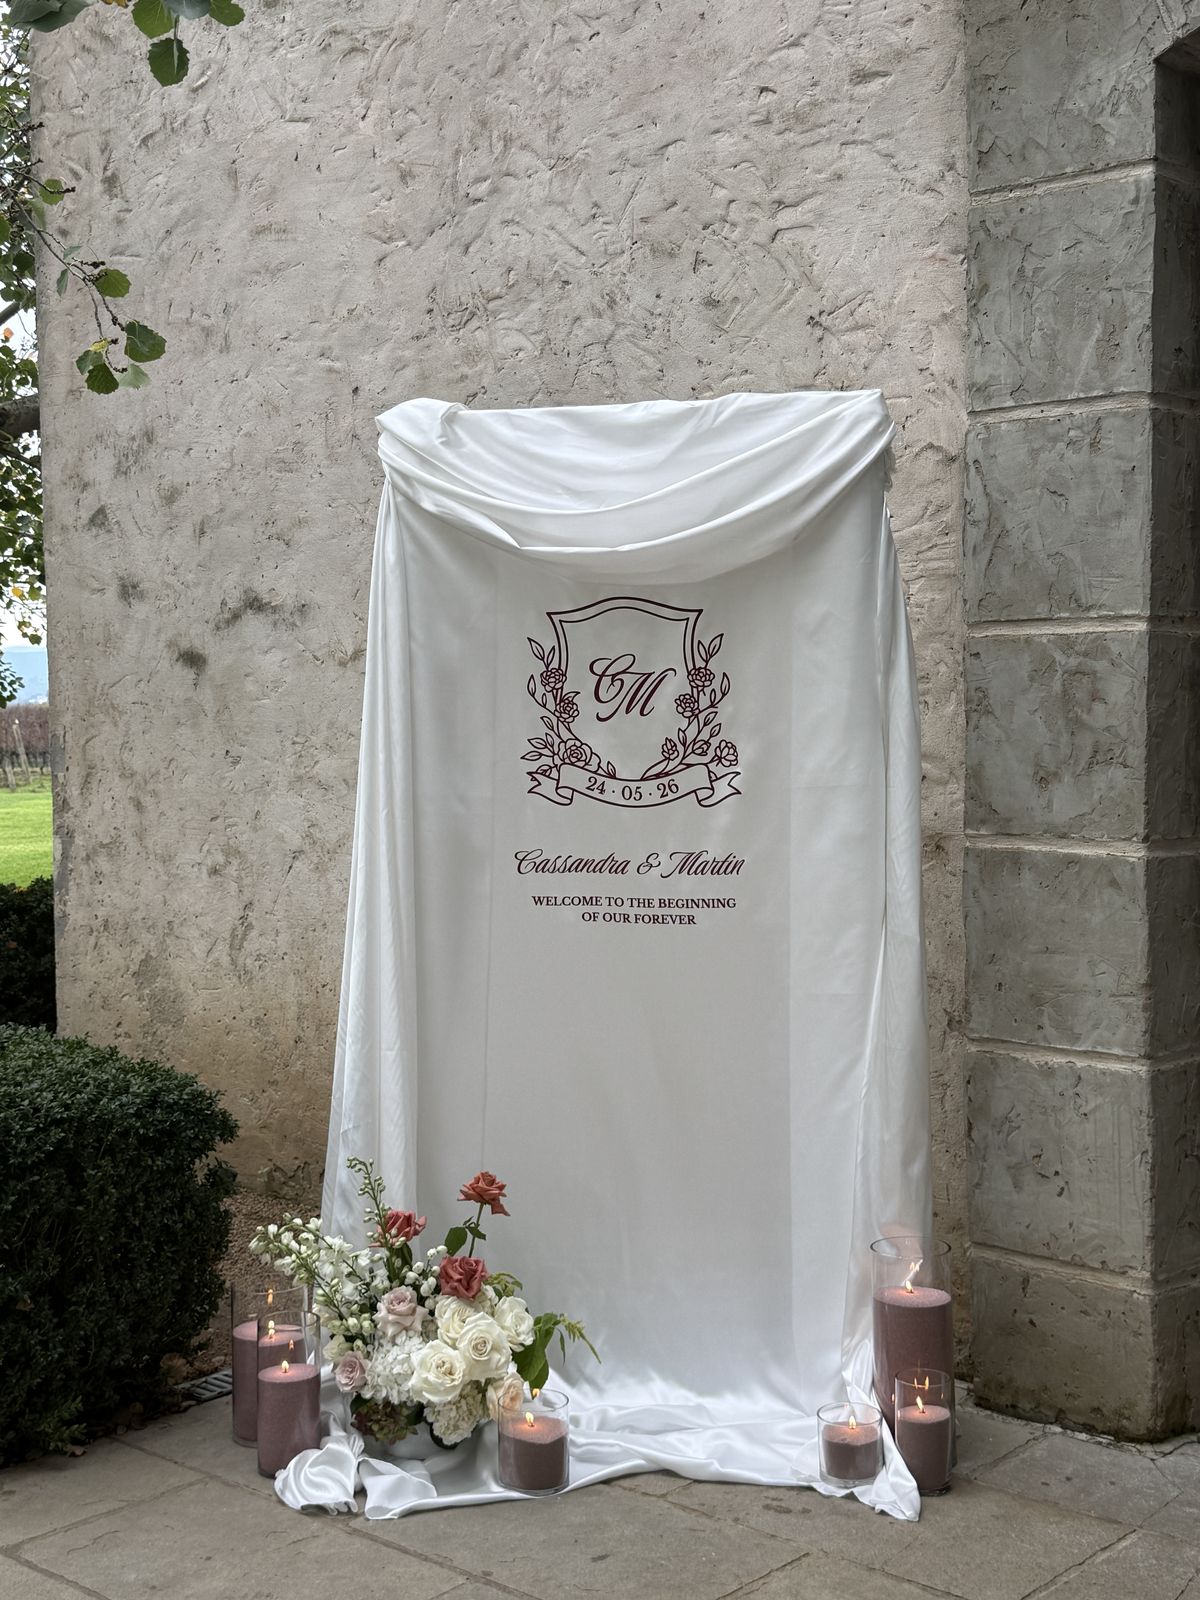
13. A crest on draped white satin
A wedding crest (your initials inside a floral or heraldic frame) printed on white satin, with the fabric swagged over the top of the stand like a curtain, reads as classic and formal.
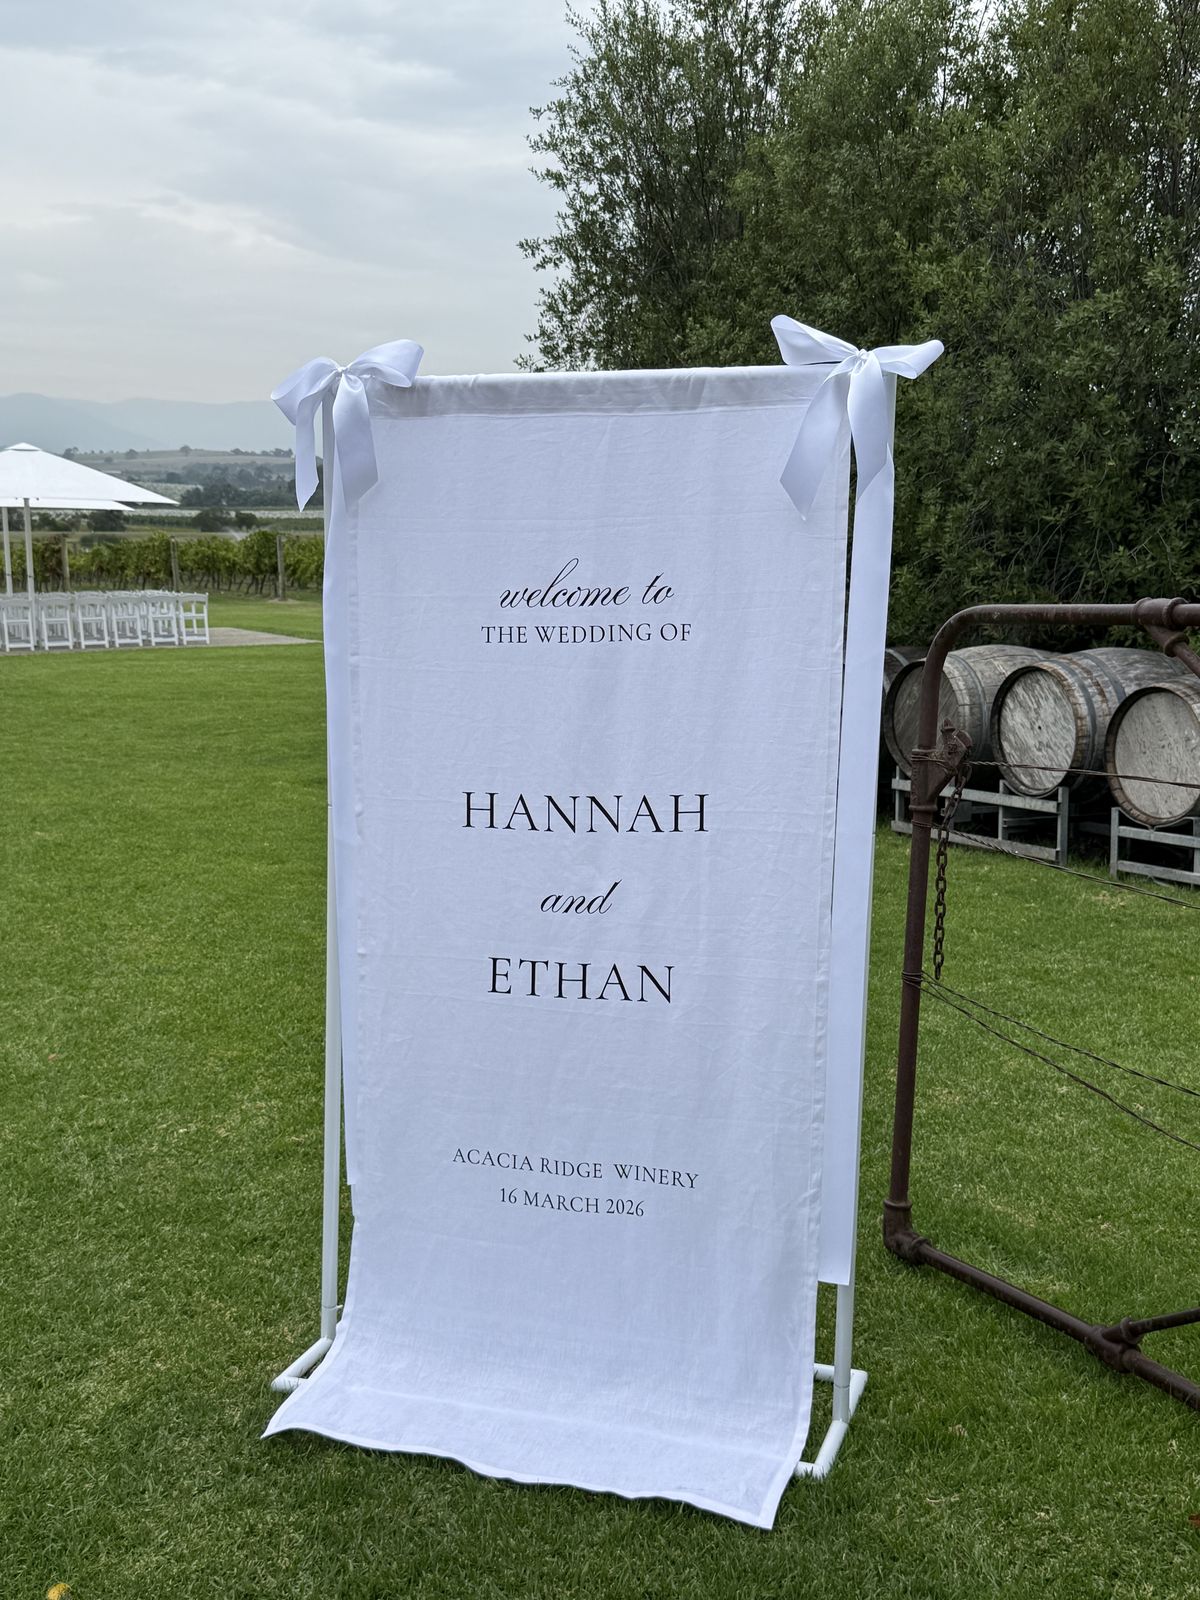
14. Linen on a frame with ribbon ties
Printed linen hung from a white frame, with long ribbons tied at each top corner, suits garden and winery ceremonies. Choose ribbon in your bridesmaid colour.
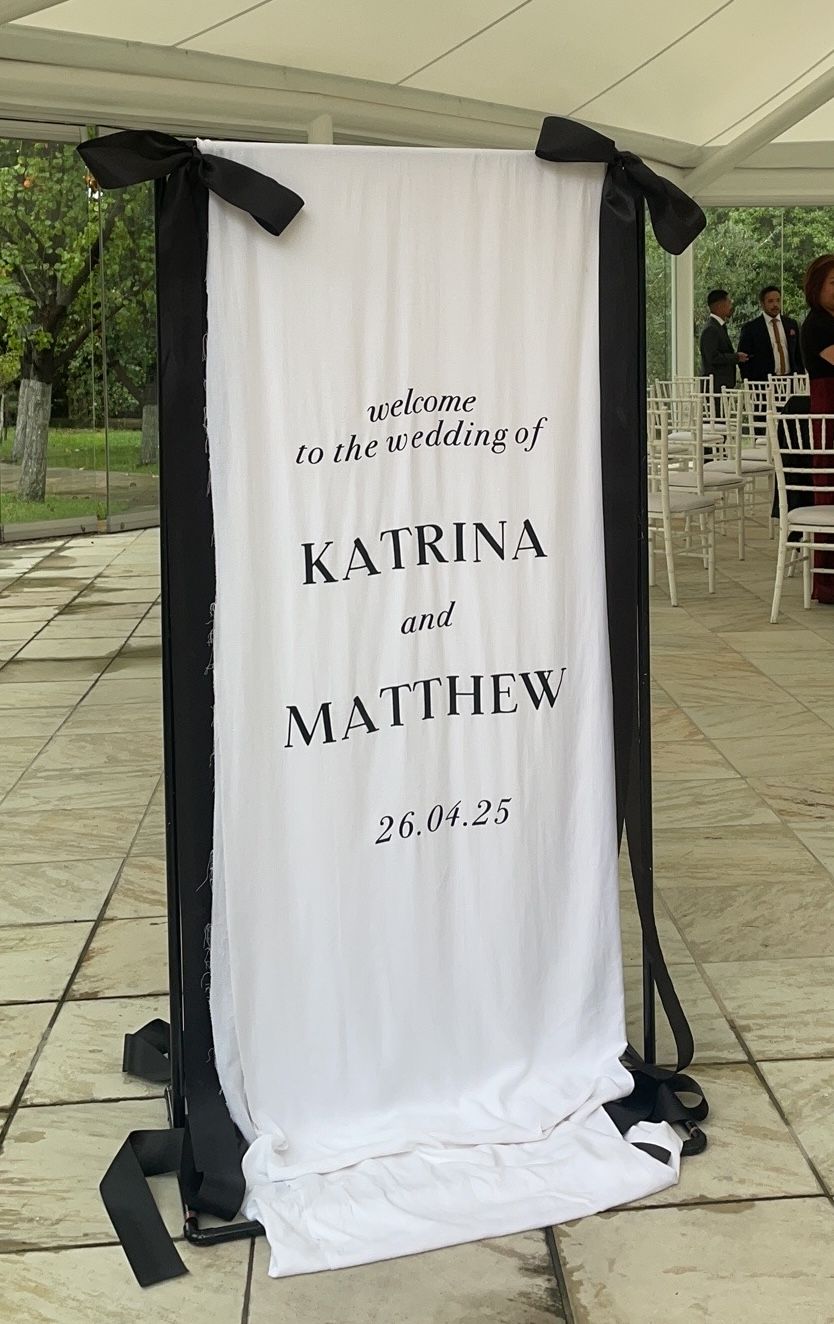
15. Black bows on white linen
The same idea in black and white feels more editorial. Long black ribbon tails running down the sides frame the lettering.
Shaped and coloured welcome sign ideas
Foamboard gives a crisp matte finish in any colour and is the most budget-friendly material. It also cuts cleanly into shapes.
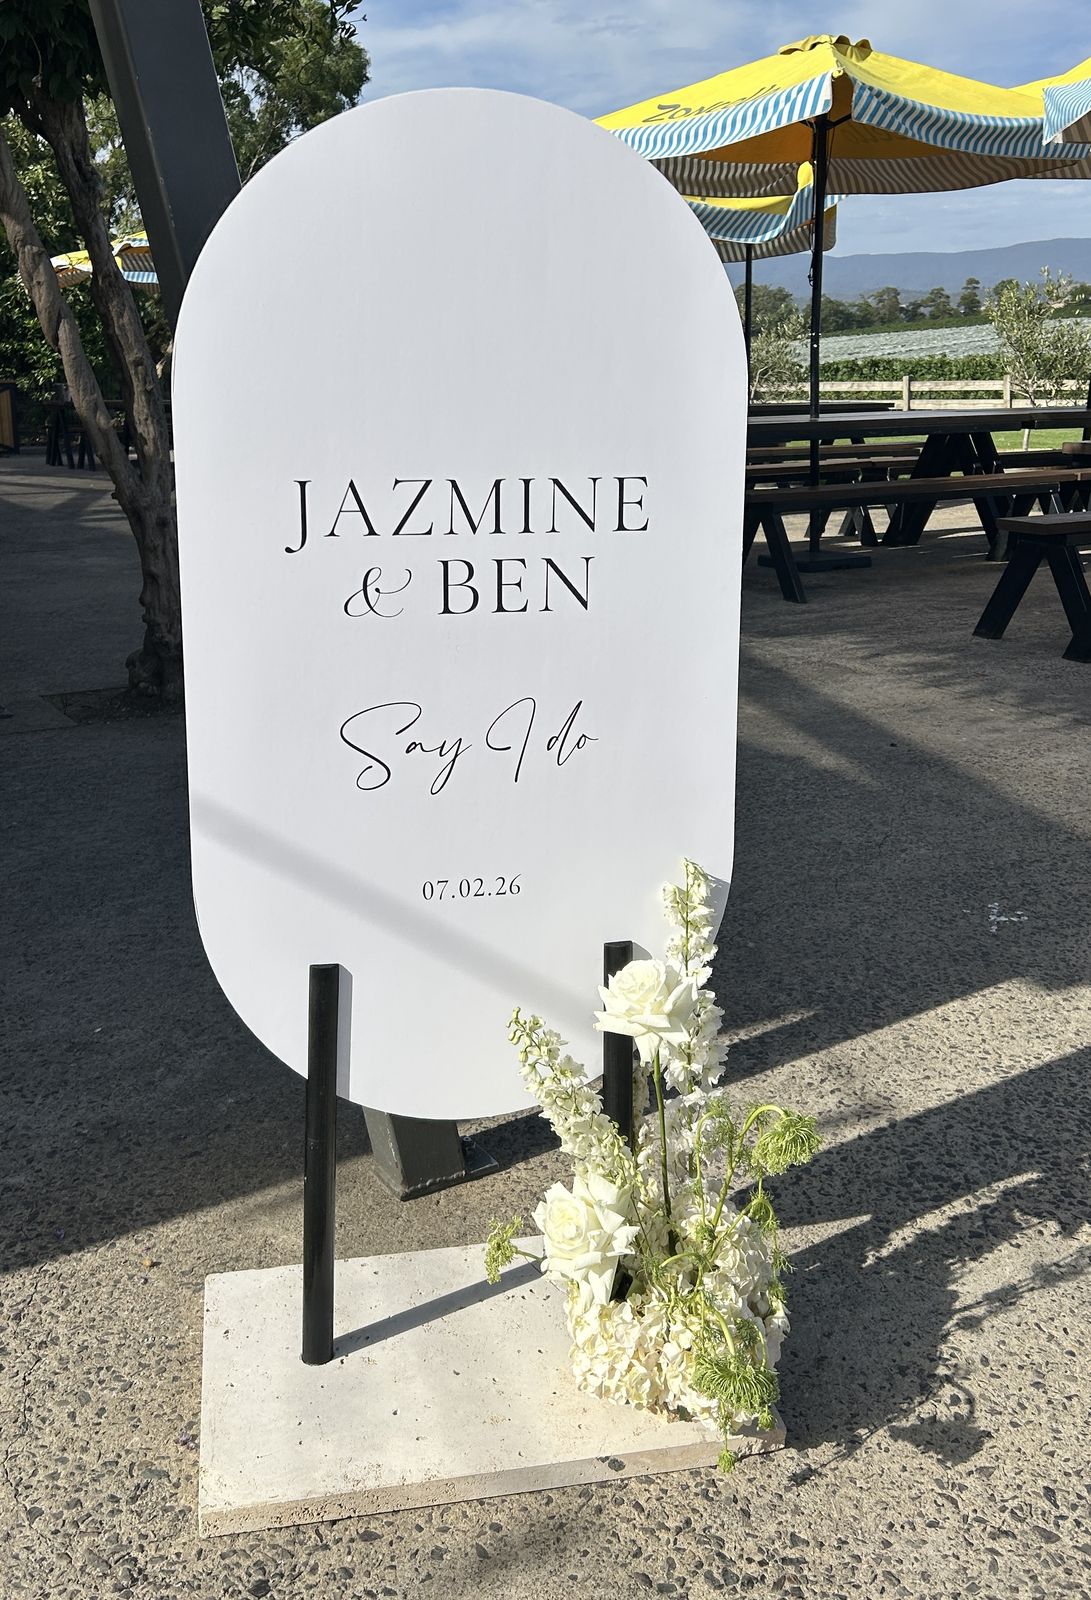
16. A pill shape on a slim stand
A rounded pill shape on a minimal black stand with a stone base looks architectural and modern. Short wording (“Say I do”) suits the narrow shape.
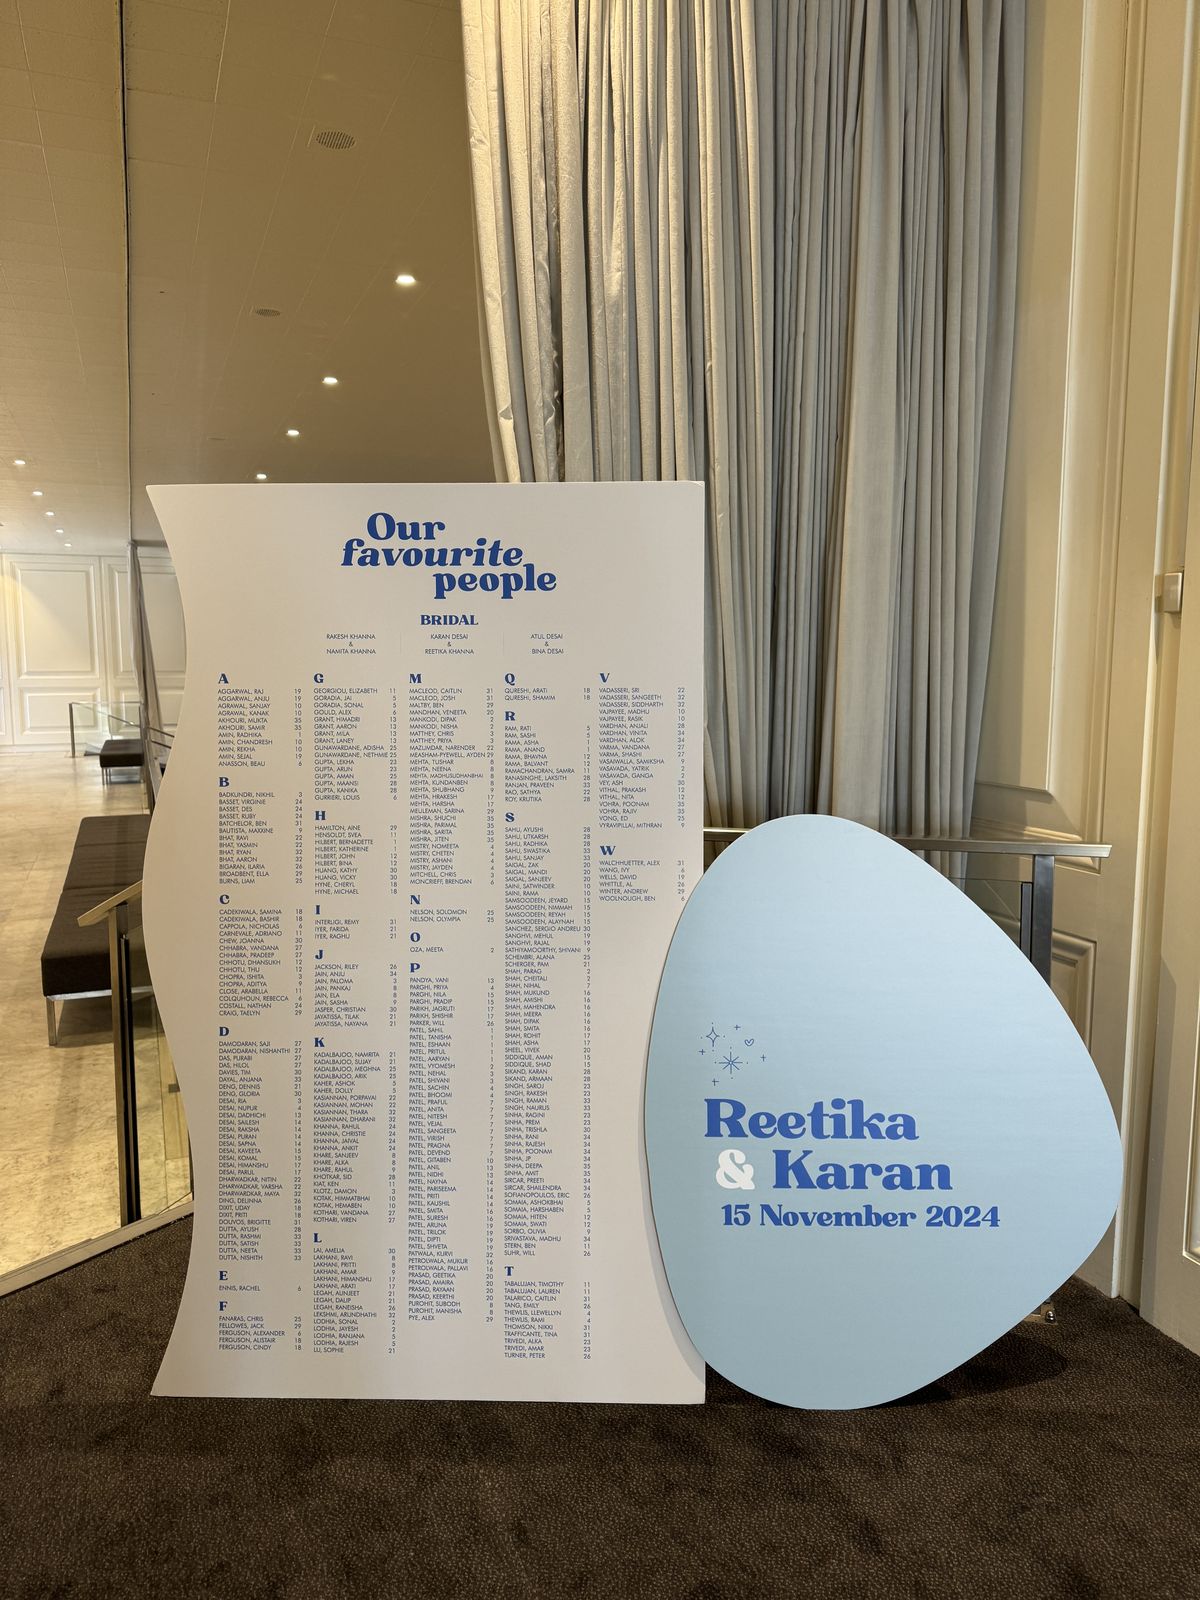
17. A pastel pebble
An organic pebble shape in a soft colour feels playful and pairs well with a wave-edged seating chart. Bold, coloured lettering stops it looking too sweet.
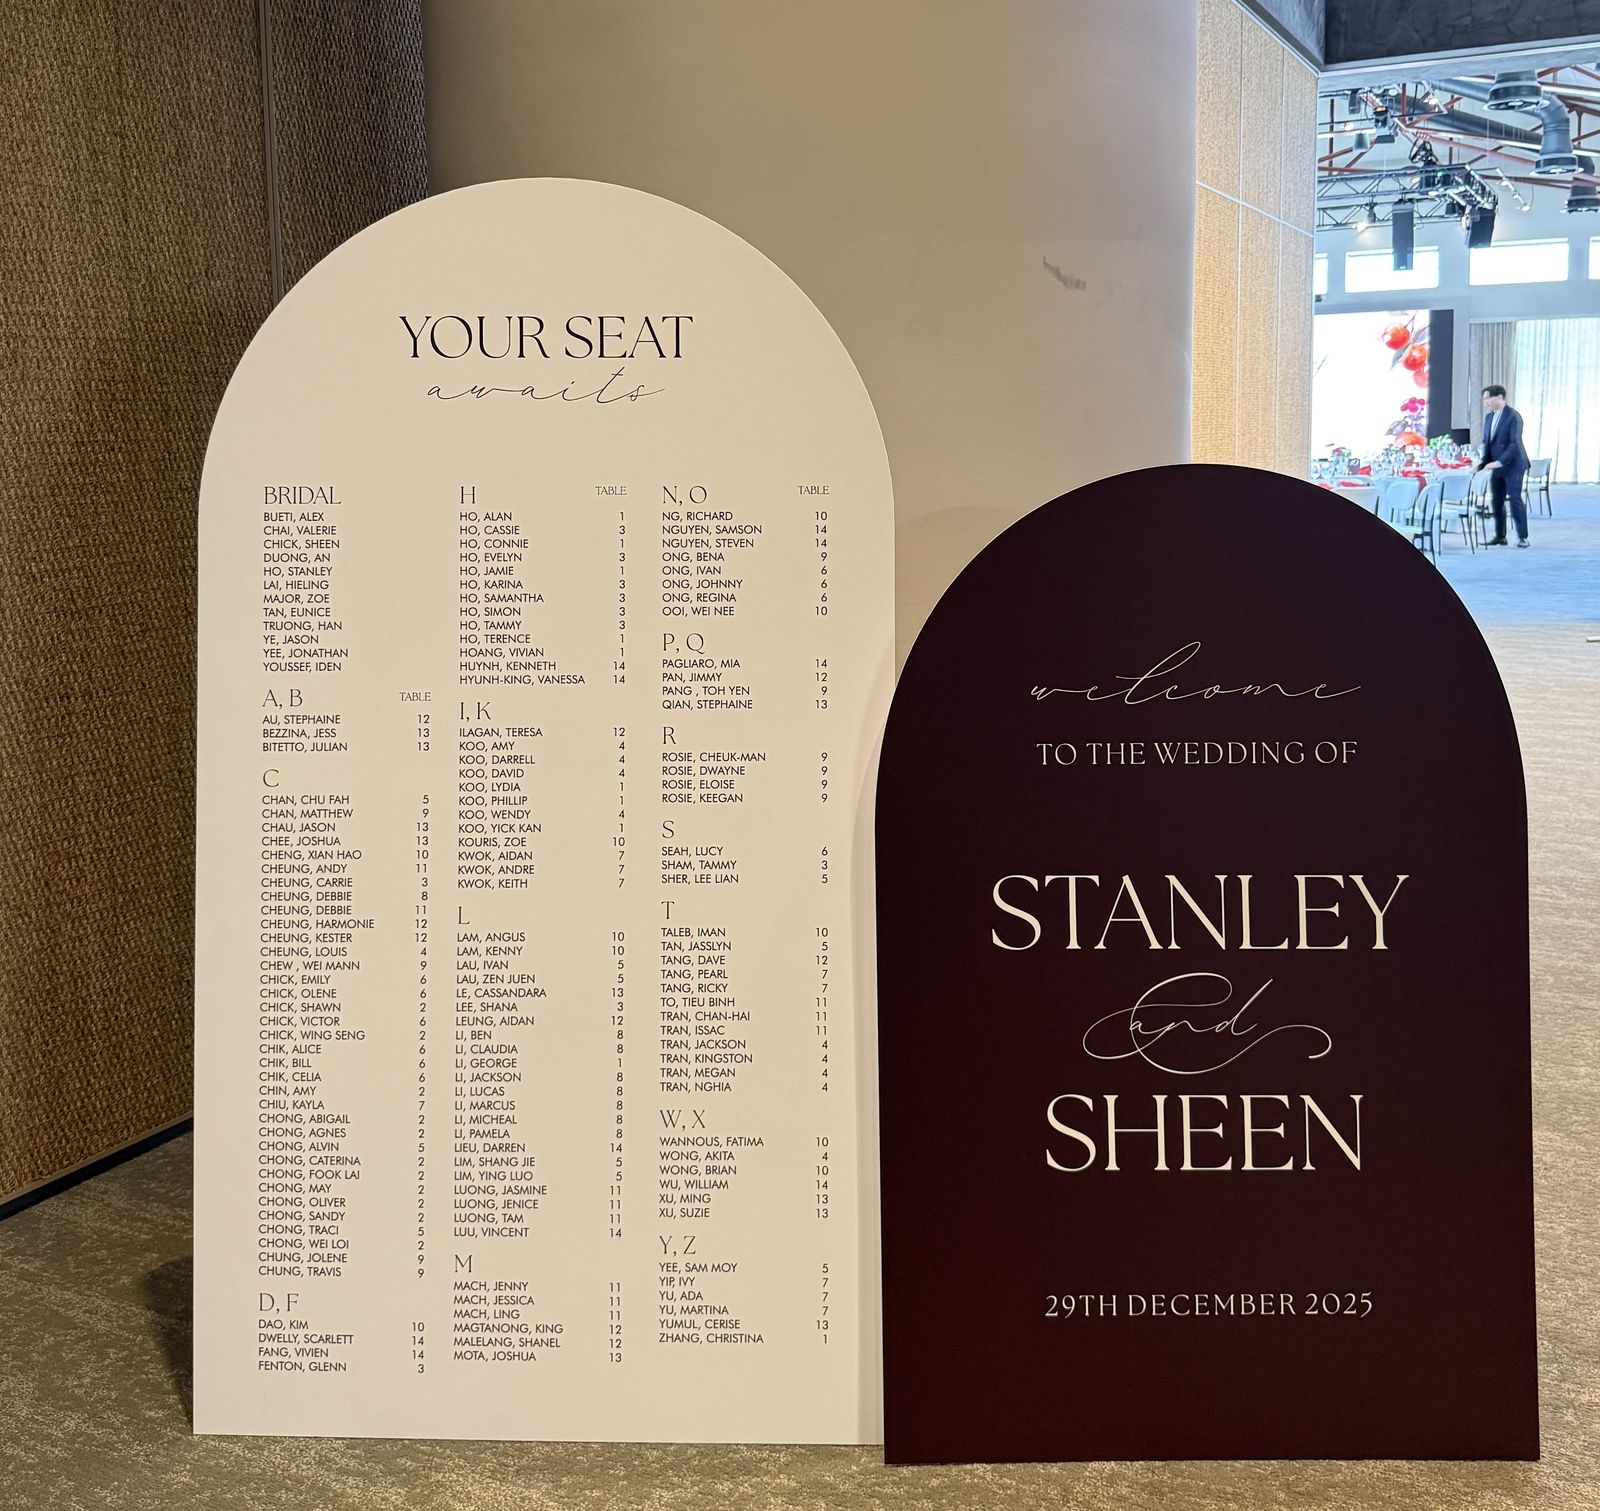
18. A deep-coloured arch
Match the arch to your darkest palette colour, such as plum, forest green or navy, with cream lettering. Placed in front of a lighter seating chart, it creates depth.
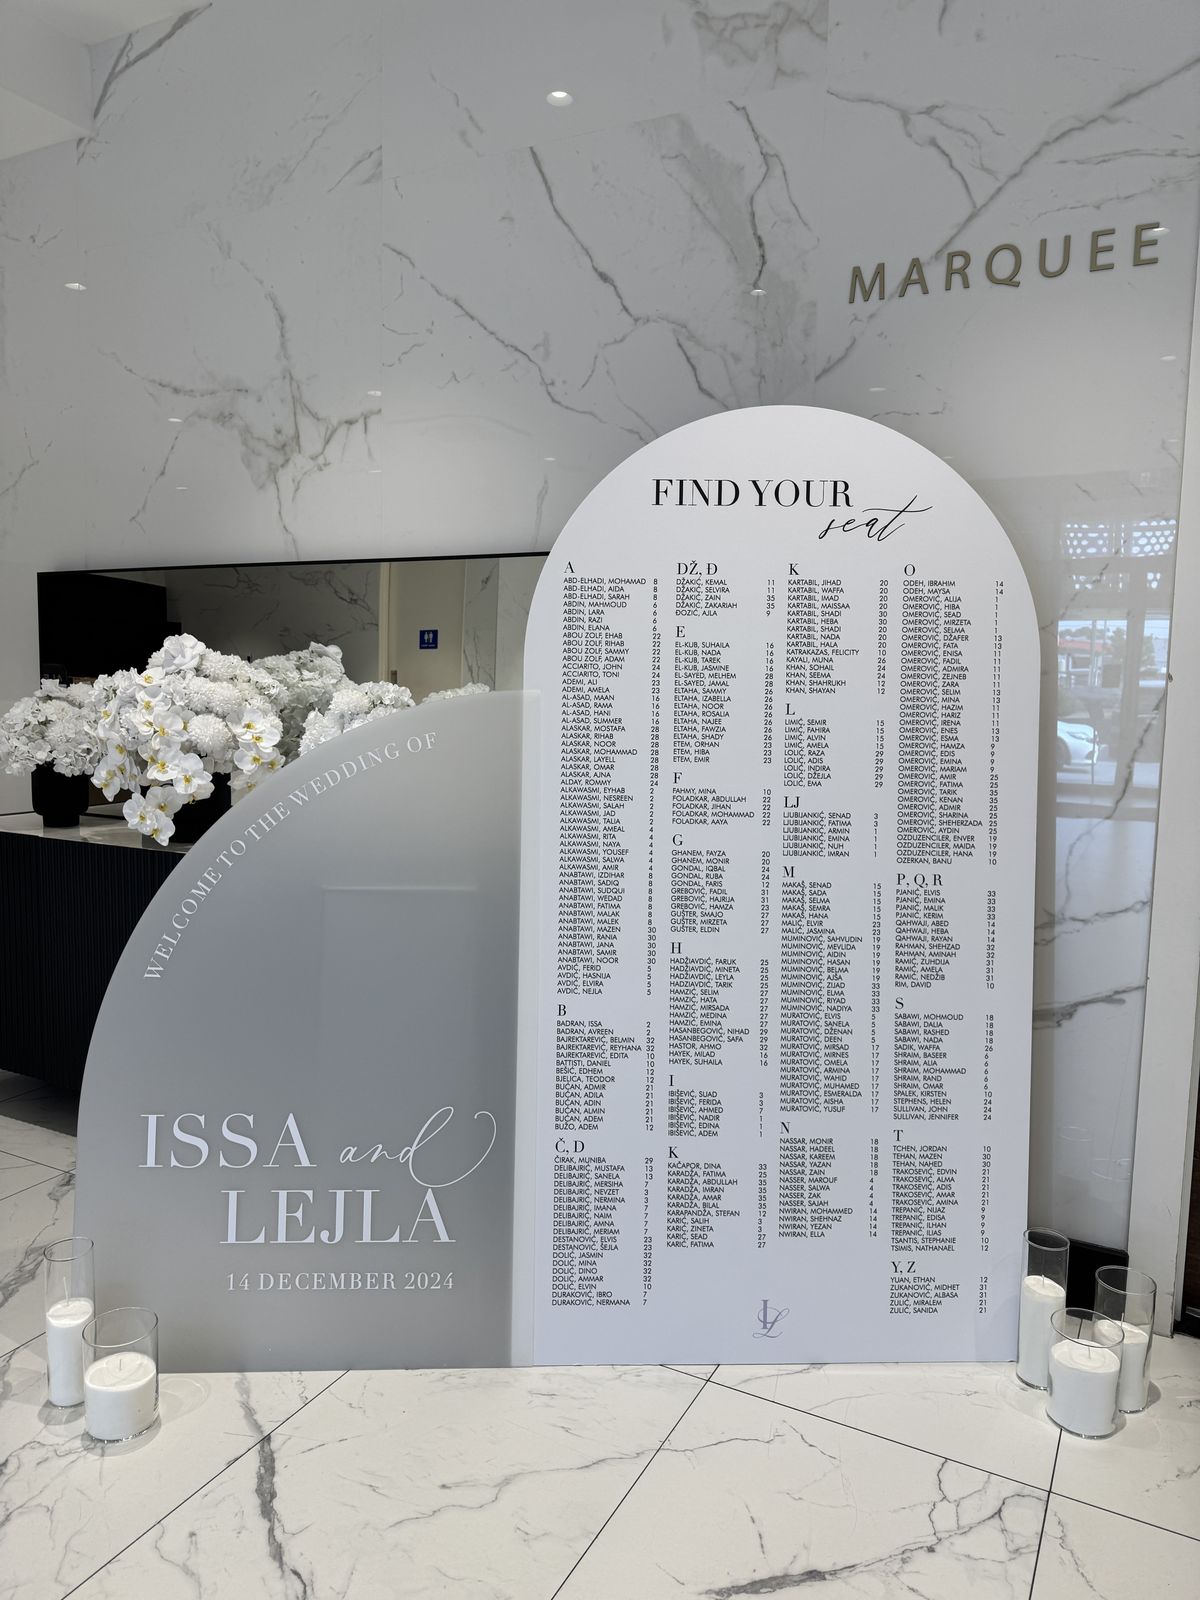
19. Curved text that follows the shape
Set “Welcome to the wedding of” along the curve of an arch or half-circle, then keep your names straight and large underneath. The curve guides the eye down to the names.
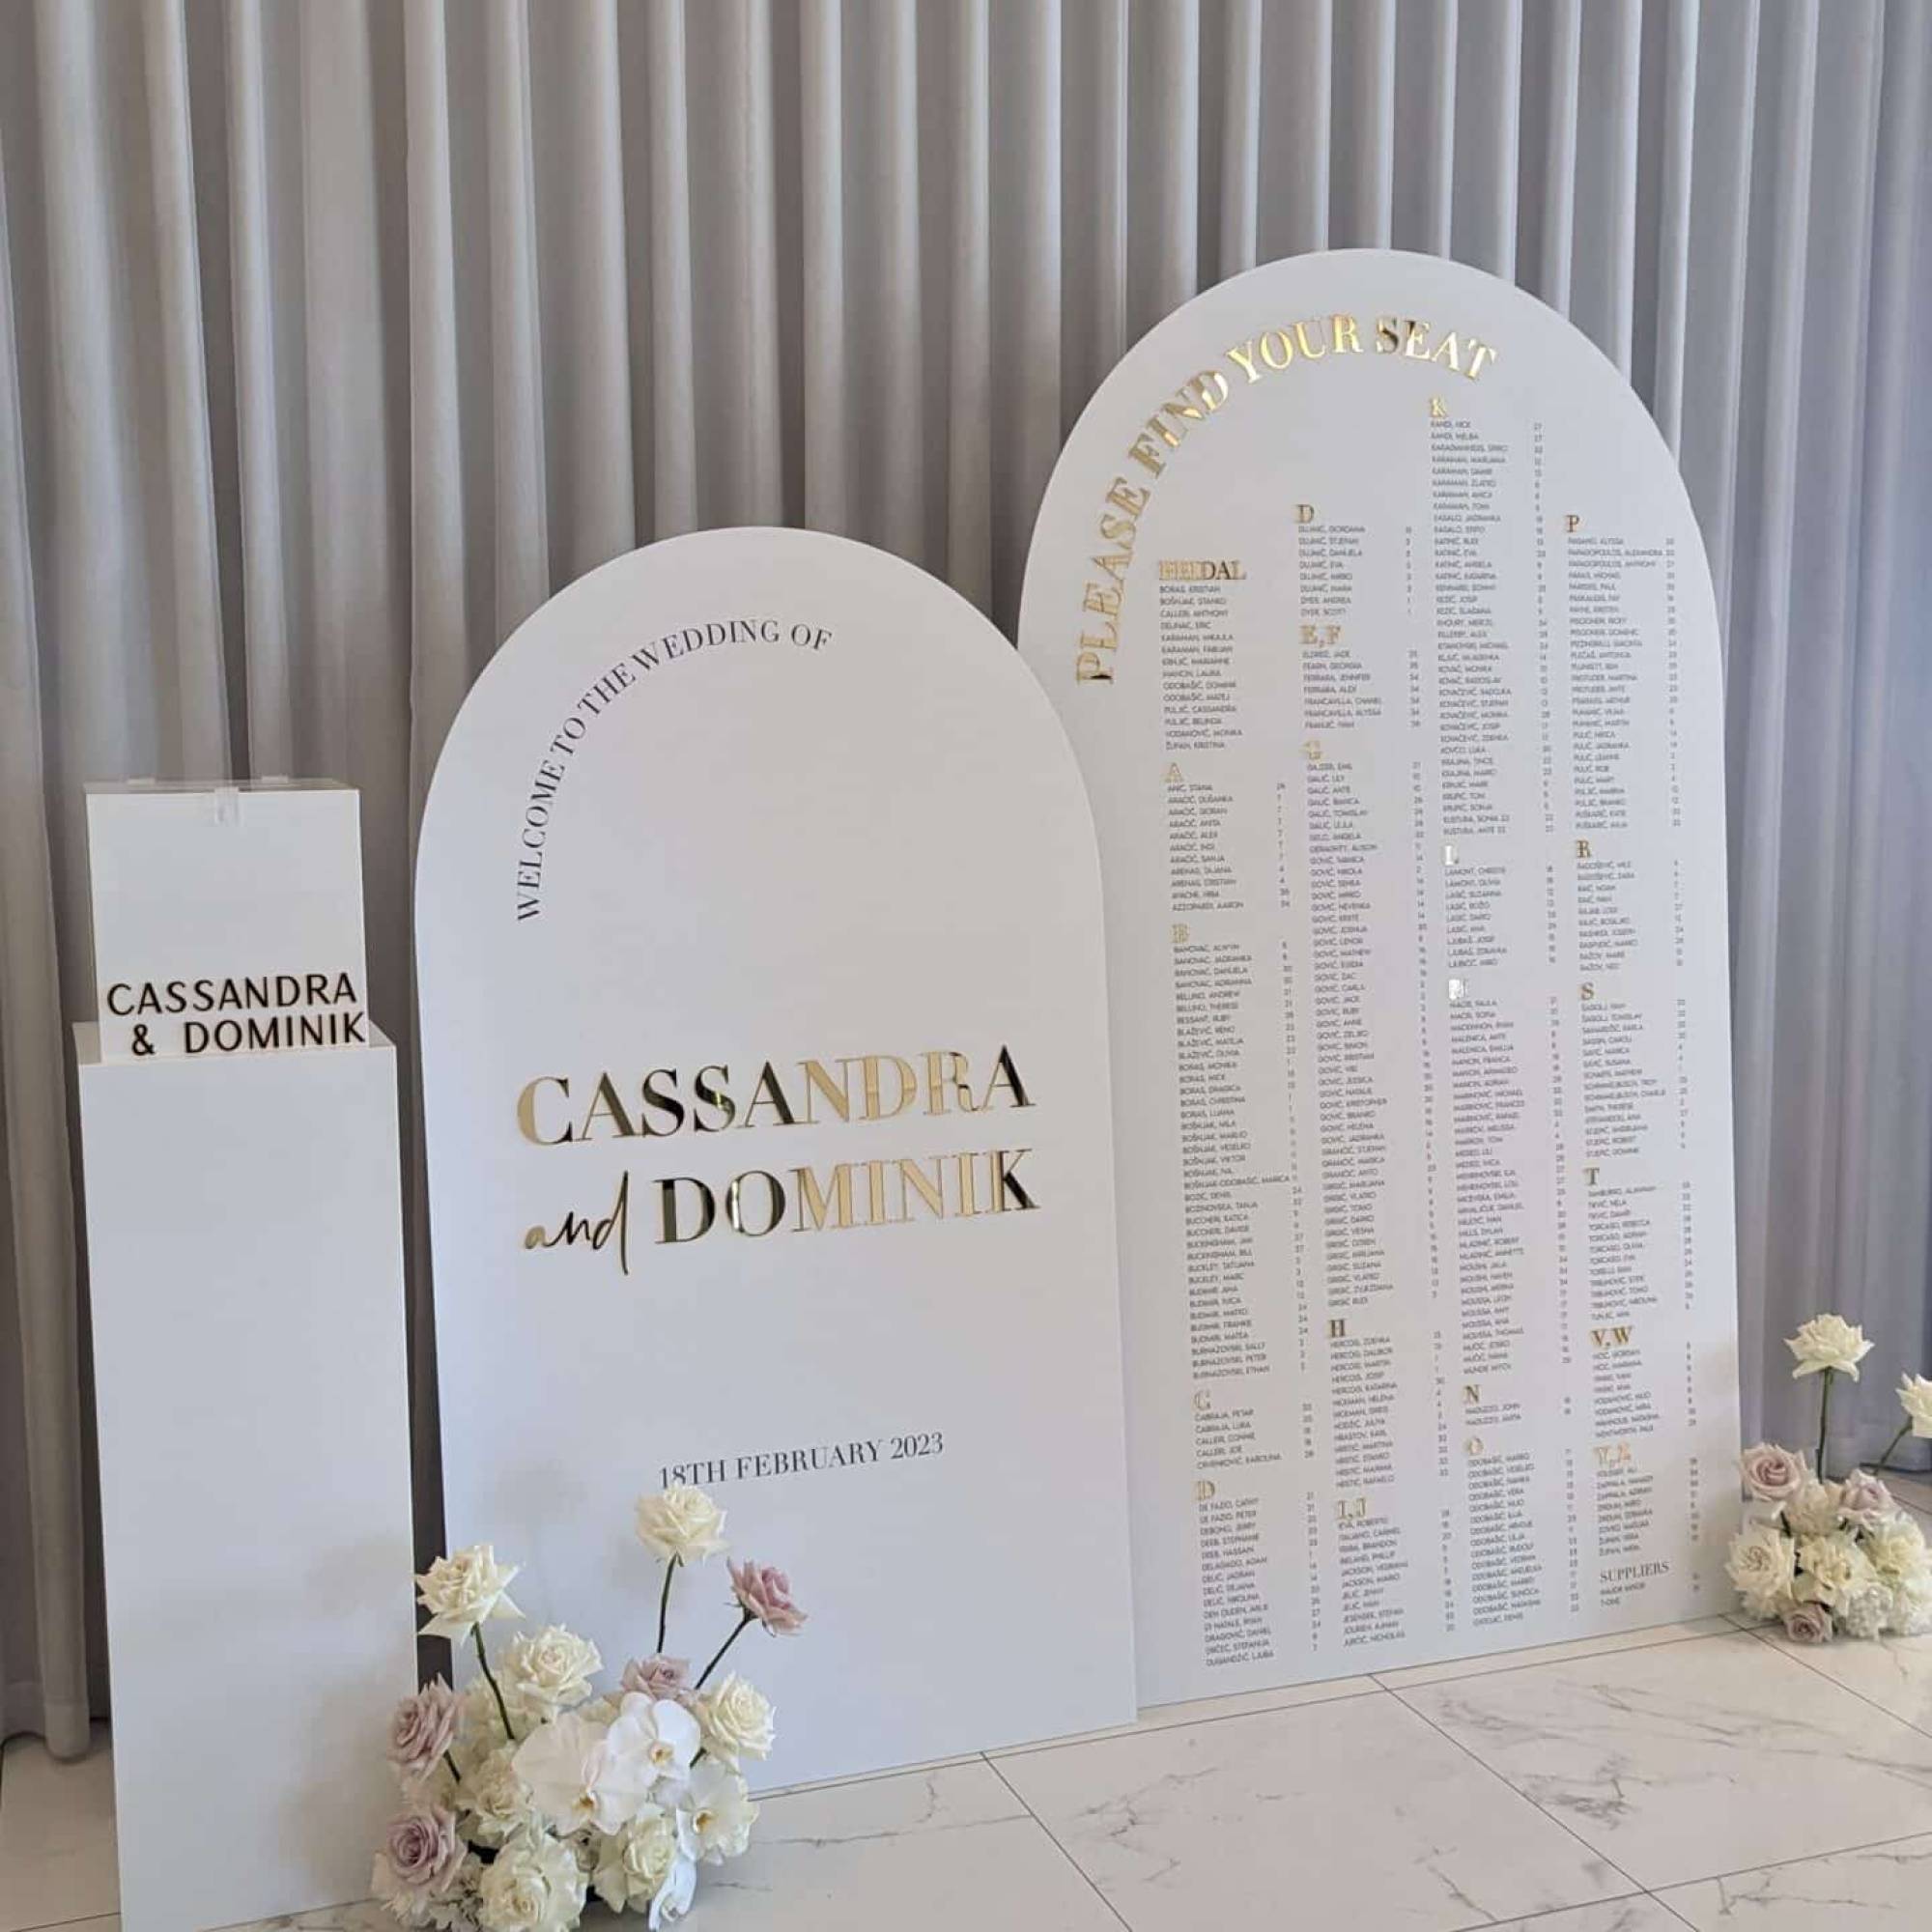
20. Gold mirror lettering on white
Mirror vinyl lettering can be applied to any base. Gold mirror names on a white arch give you shine without a fully reflective sign, so it stays easy to read from any angle.
Wording and layout ideas
21. A bilingual greeting
Put “Welcome” and the greeting in a second language at the same size, so neither family’s language feels like a footnote. This sign pairs “Welcome” with “Dobro došli”, used in Croatian, Serbian and Bosnian.

22. Names in two scripts
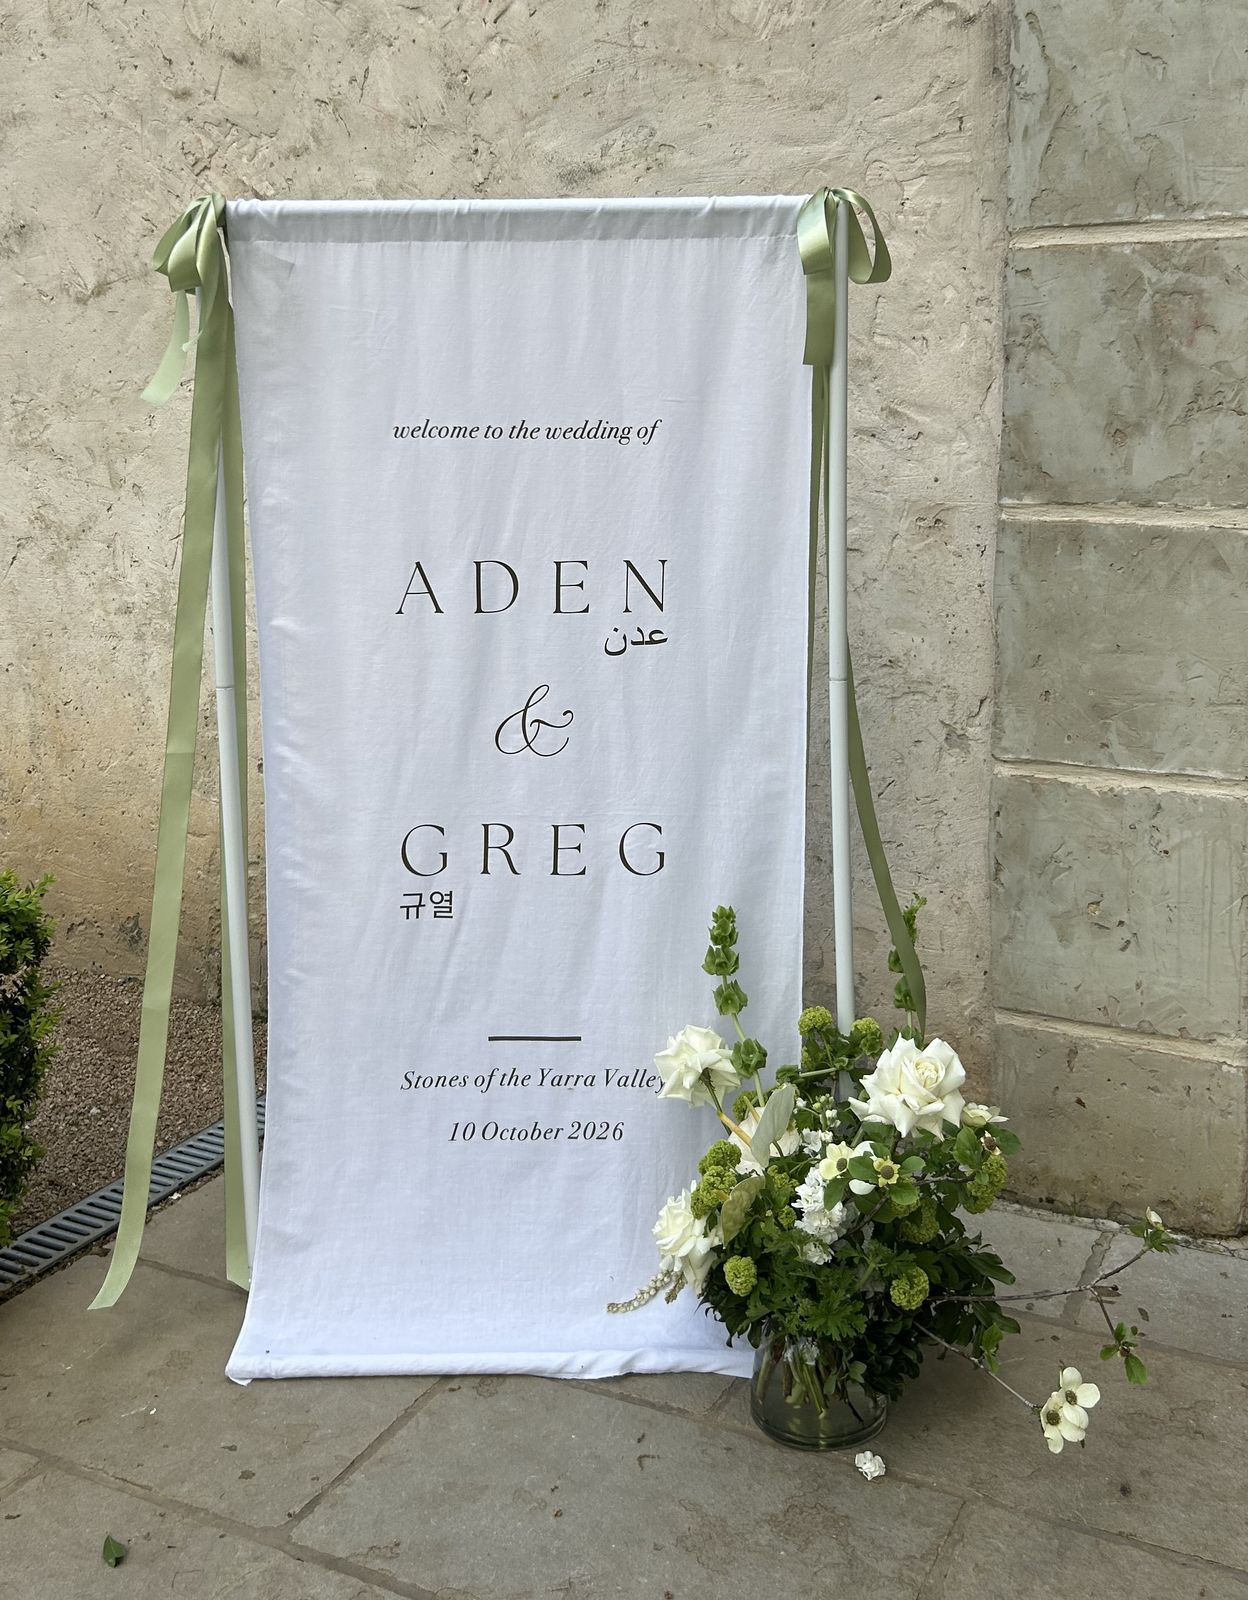
Another way to honour two cultures: write each name in English with the same name in its original script beneath it. Ask a native speaker to check the characters before you approve the proof.
23. A verse or quote at the foot
A short line of scripture, a lyric or a quote set small at the bottom of the sign adds meaning without competing with your names. Keep it to one line.
24. The surname style
Instead of first names, use your shared surname: “The Wedding of The [Surname]s”. It is a nice option if you are taking one name, and it is short enough to set very large.
25. A welcome sign with a QR seating code
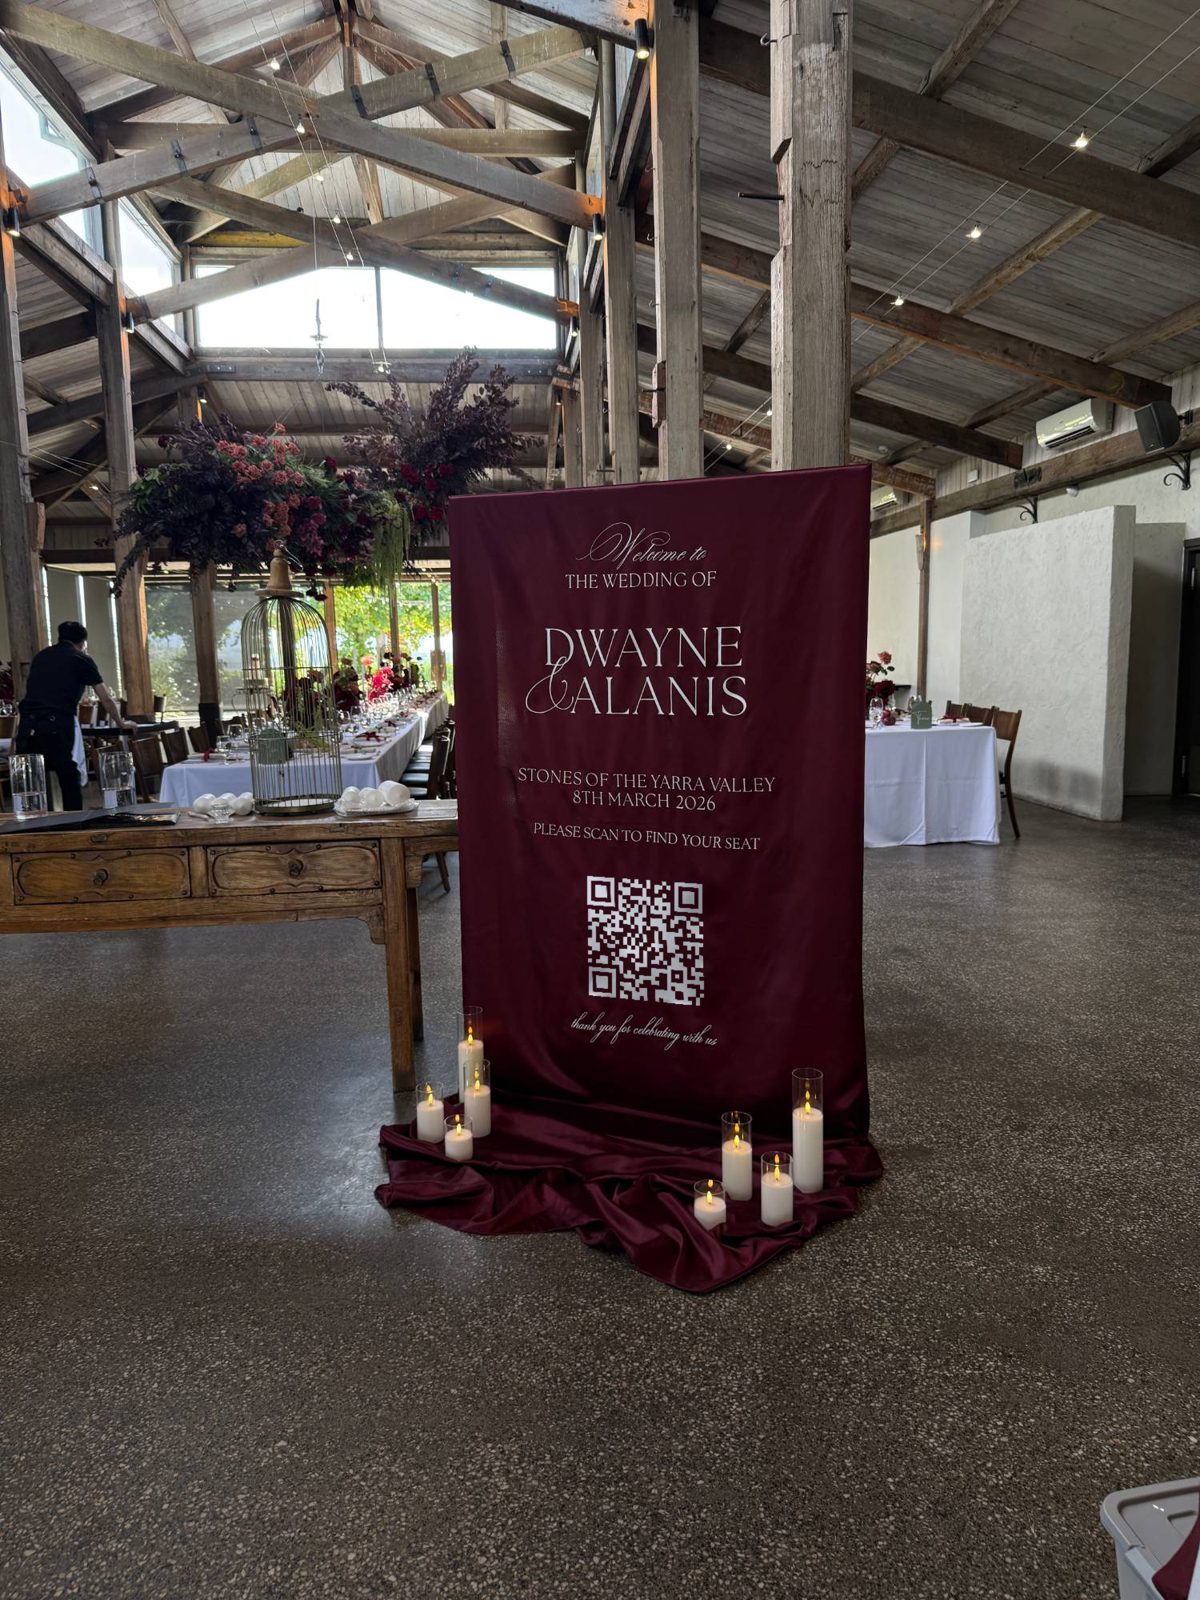
Put your names, venue, date and a QR code on one sign. Guests scan it with their phone camera, type their name and see their table, so you do not need a separate printed chart at the entrance. It is the most popular way couples use our QR code seating chart, and the hero photo at the top of this post is exactly this: a burgundy satin welcome sign with the QR code printed large and high-contrast so guests can scan it from a step back.
Styling and placement tips
- Put it where guests pause. The best spot is where guests stop naturally: the top of a staircase, the door of the ceremony space, or the end of the path from the car park.
- Light it at night. Mirror and dark acrylic both need light on the lettering after sunset. A cluster of candles at the base (real or LED, depending on your venue’s rules) does the job.
- Plan for the weather. A Melbourne afternoon can turn windy quickly. Fabric signs on frames and tall arches outdoors need a weighted base or a sheltered spot, and it is worth having an indoor backup position.
- Match the stand to the sign. Easels suit rectangular acrylic and framed mirrors. Metal frame stands suit fabric and hanging panels. Arches and shaped boards usually lean on a wall or plinth with florals at the base.
- Design it with the seating chart. If your welcome sign and seating chart stand side by side, plan them as a pair in size, material and font. For more on choosing between materials, read acrylic vs mirror vs fabric wedding signs, and for the full planning picture see our wedding signage Melbourne guide.
How a custom welcome sign is made
- Send your invitation or moodboard. We match fonts, colours and motifs so the sign reads as part of your stationery suite.
- Approve a digital proof. You see the exact layout, size and material before anything is cut or printed.
- Production. Cut, printed and finished in Melbourne. Allow two to three weeks; rush jobs are possible depending on material.
- Delivery or pick-up. Signs are delivered and placed at your venue with any photo booth booking, or collected from our Ravenhall studio.
Welcome signs are made to order and are yours to keep. Stands and easels can be hired or purchased.
If you would like a welcome sign designed to match your invitations, have a look at our custom wedding signage and then send us your date and moodboard. We will come back with a proof and an itemised quote.
Wedding welcome sign questions
What size should a wedding welcome sign be?
A1 (594 × 841 mm) is the most common size for a welcome sign on an easel and reads clearly from about five metres. For a long entrance, a large foyer or an outdoor ceremony, go up to 900 × 1200 mm or use a free-standing arch panel.
What should a wedding welcome sign say?
At minimum, a greeting, your names and the date. Many couples add the venue name, a monogram or one short personal line. Keep it short enough that a guest can read it in a couple of seconds while walking past.
How much does a wedding welcome sign cost in Melbourne?
Ghost Booth Events signage packages start from $500. A package typically covers a welcome sign plus a seating chart or table numbers in matching materials. Individual pieces are quoted by size, material and whether a stand or easel is included.
How far ahead should I order my welcome sign?
Allow four to six weeks: one to two weeks for design and proofing, then two to three weeks for production. Rush orders are possible depending on the material.
Can my welcome sign also be my seating chart?
Yes. You can combine a welcome sign with a printed seating chart on one large panel, or add a QR code so guests scan to find their table. The QR option keeps the entrance uncluttered and lets the seating change right up to the day without reprinting the sign.